Zelogx Platform - Demo Gallery
Enjoy the Zelogx mission-driven demo — MSL Setup Pro mission guide
Want to try the live demo? → Book a Demo
This page already contains the full step-by-step scenario so you can reproduce the demo on your own Proxmox host today. Start from Mission 2-2 – Experience the MSL Setup installation to walk through the step-by-step setup.
Table of Contents
- Mission-1 Complete VPN setup
- Mission-2 At the scheduled demo time
- Mission-3 Build VMs inside an isolated environment
- Mission-4 Full isolation — confirm VMs cannot communicate across environments
- Mission-5 Experience the self-care dashboard
Mission 1 - Complete VPN setup. Est. time: 15 minutes
M1-1 - Install the VPN client per the instructions
You may use either Pritunl Client or the OpenVPN client.
- OpenVPN: download at https://openvpn.net/community/
- Pritunl: download at https://client.pritunl.com/#install
Pritunl supports both OpenVPN and WireGuard. Use whichever you prefer.
M1-2 - Configure the VPN client to connect to the demo
-
Save the attachment sent from info@zelogx (for example: MSLSetupDemo_SCHyyyymmddHHMM.tar).
-
For OpenVPN:
- Extract the .tar and import the included MSLSetupDemo_SCHyyyymmddHHMM_MSLSetupDemo.ovpn into your OpenVPN client.
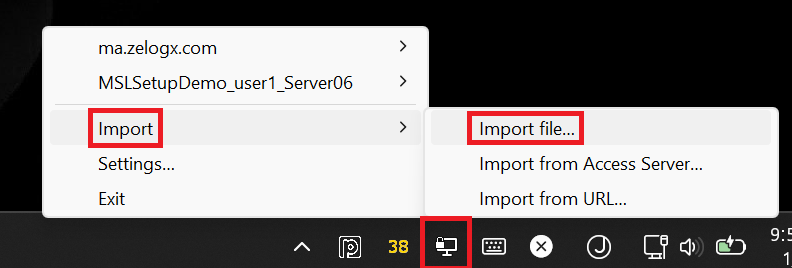
- Run the OpenVPN GUI, right-click the tray icon, choose Import -> Import file…, and select the .ovpn file.
-
For Pritunl:
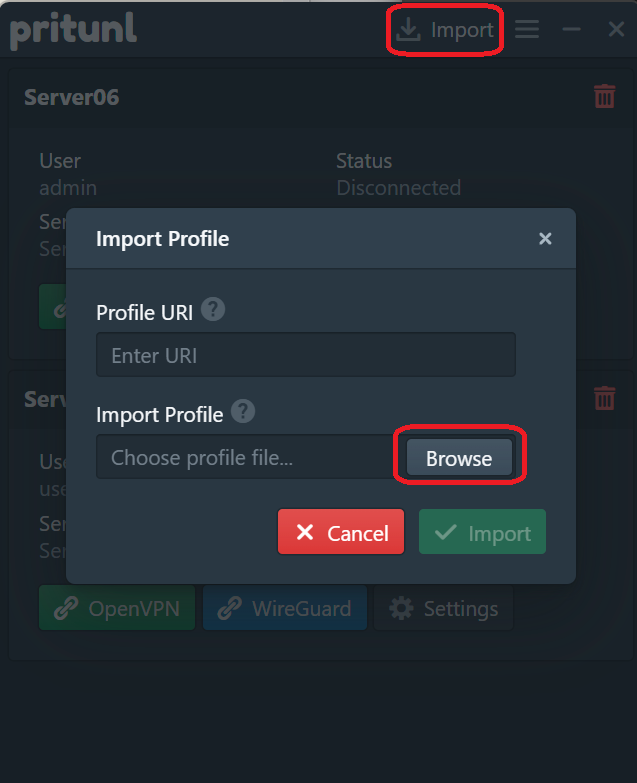
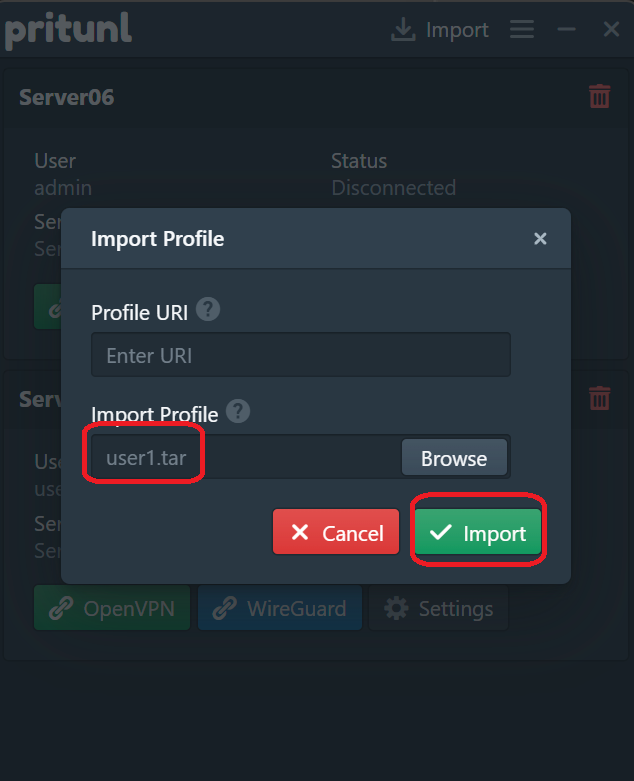
- Import the .tar into the Pritunl Client.
- Click the Pritunl tray icon, click Import -> Browse -> select MSLSetupDemo_SCHyyyymmddHHMM.tar, then click Import.
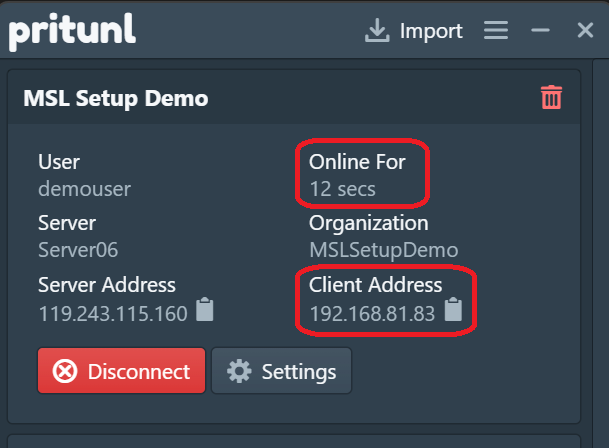
M1-3 - Verify the VPN connection
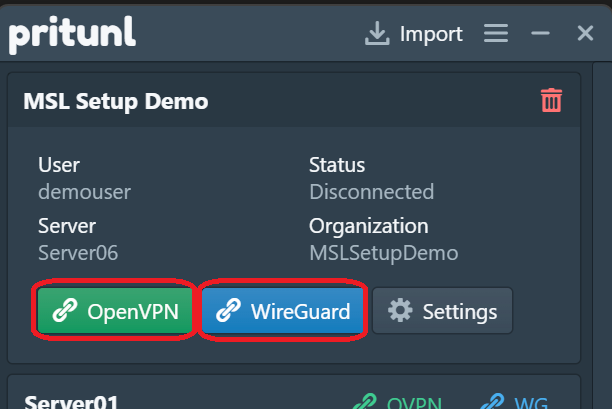
Confirm you can connect from the Pritunl client or OpenVPN. For Pritunl, verify:
- The “Online for” value is incrementing.
- A Client Address (IP) is assigned.
Once connected, verify the ping below from Windows Terminal:
PS C:\Users\urname> ping 172.16.21.254

Pinging 172.16.21.254 with 32 bytes of data:
Reply from 172.16.21.254: bytes=32 time=1ms TTL=64
Reply from 172.16.21.254: bytes=32 time=1ms TTL=64
Reply from 172.16.21.254: bytes=32 time=1ms TTL=64
Reply from 172.16.21.254: bytes=32 time=1ms TTL=64

Ping statistics for 172.16.21.254:
    Packets: Sent = 4, Received = 4, Lost = 0 (0% loss),
Approximate round trip times in milli-seconds:
    Minimum = 1ms, Maximum = 1ms, Average = 1ms
M1-4 - Disconnect and wait
After verification, disconnect the VPN and wait until your scheduled demo time.
Other missions may be running—do not draw attention. Disconnect promptly.
M1 Wrap-up
What this mission demonstrated
- Installing the Pritunl client
- Importing a client profile into the Pritunl client
— Mission1 Accomplished! —
Mission 2 - At the scheduled demo time. Est. time: 30 minutes
M2-1 - VPN connection
You’ll receive another email about an hour before the scheduled demo. Move to a comfortable workspace and be ready. When the demo time arrives, immediately connect the VPN and follow the next instructions.
M2-2 - Experience the MSL Setup installation
Run the commands below and complete the MSL Setup installation within 20 minutes.
M2-2-1 - Log in to the Proxmox dashboard
Proxmox should already be running. Log in to the Proxmox dashboard:
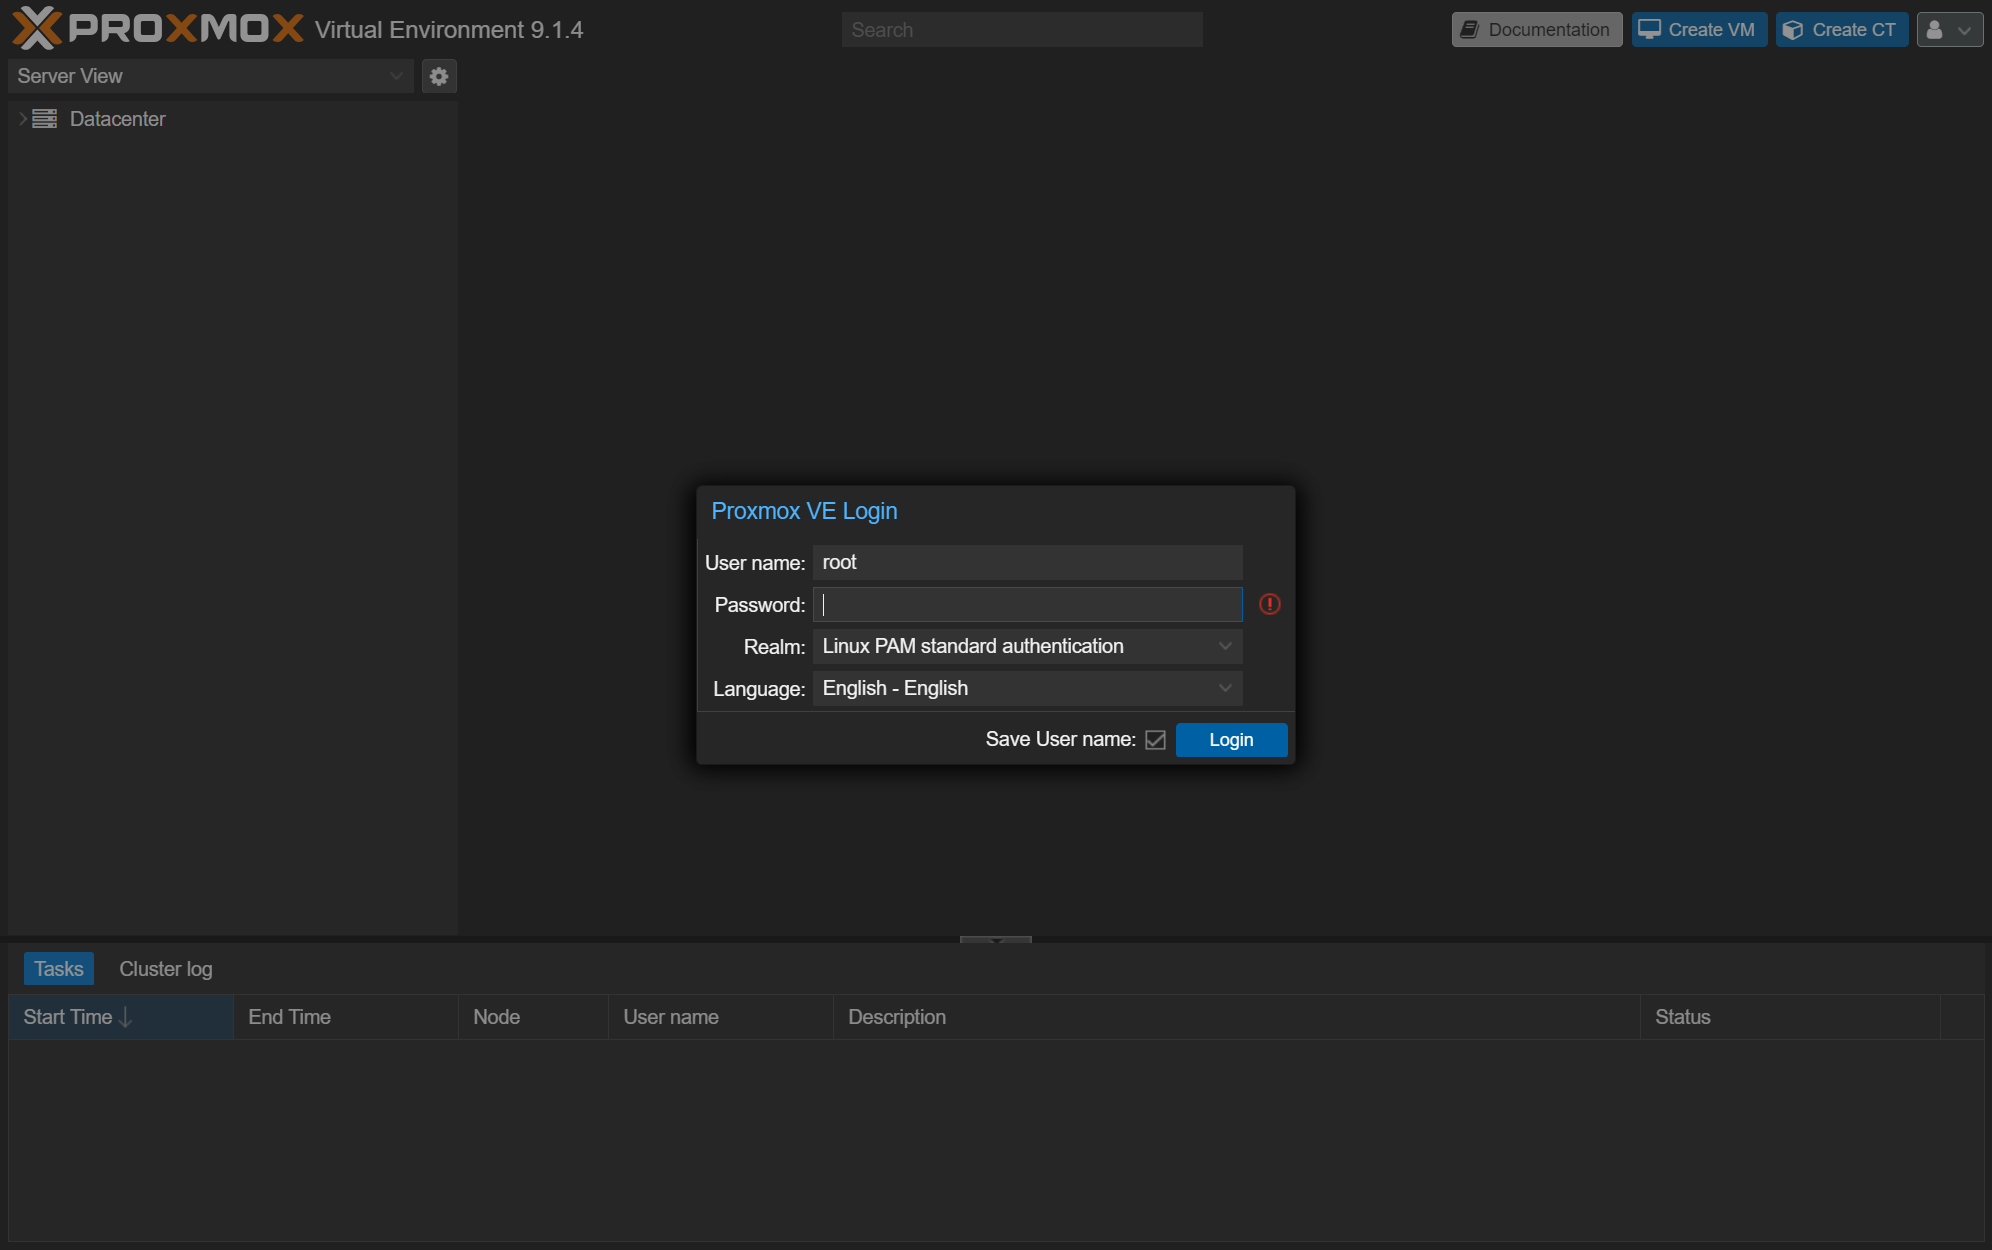
https://172.16.21.1:8006
User name: root
Password: (Use the Proxmox root password provided in the email “Your demo environment is ready”)
Realm: Linux PAM standard authentication
SSH access to the demo environment may be disabled.
M2-2-2 - Start installation from the Proxmox console
- After logging in, choose Datacenter -> pve16 and click the >_ Shell button to open the console.
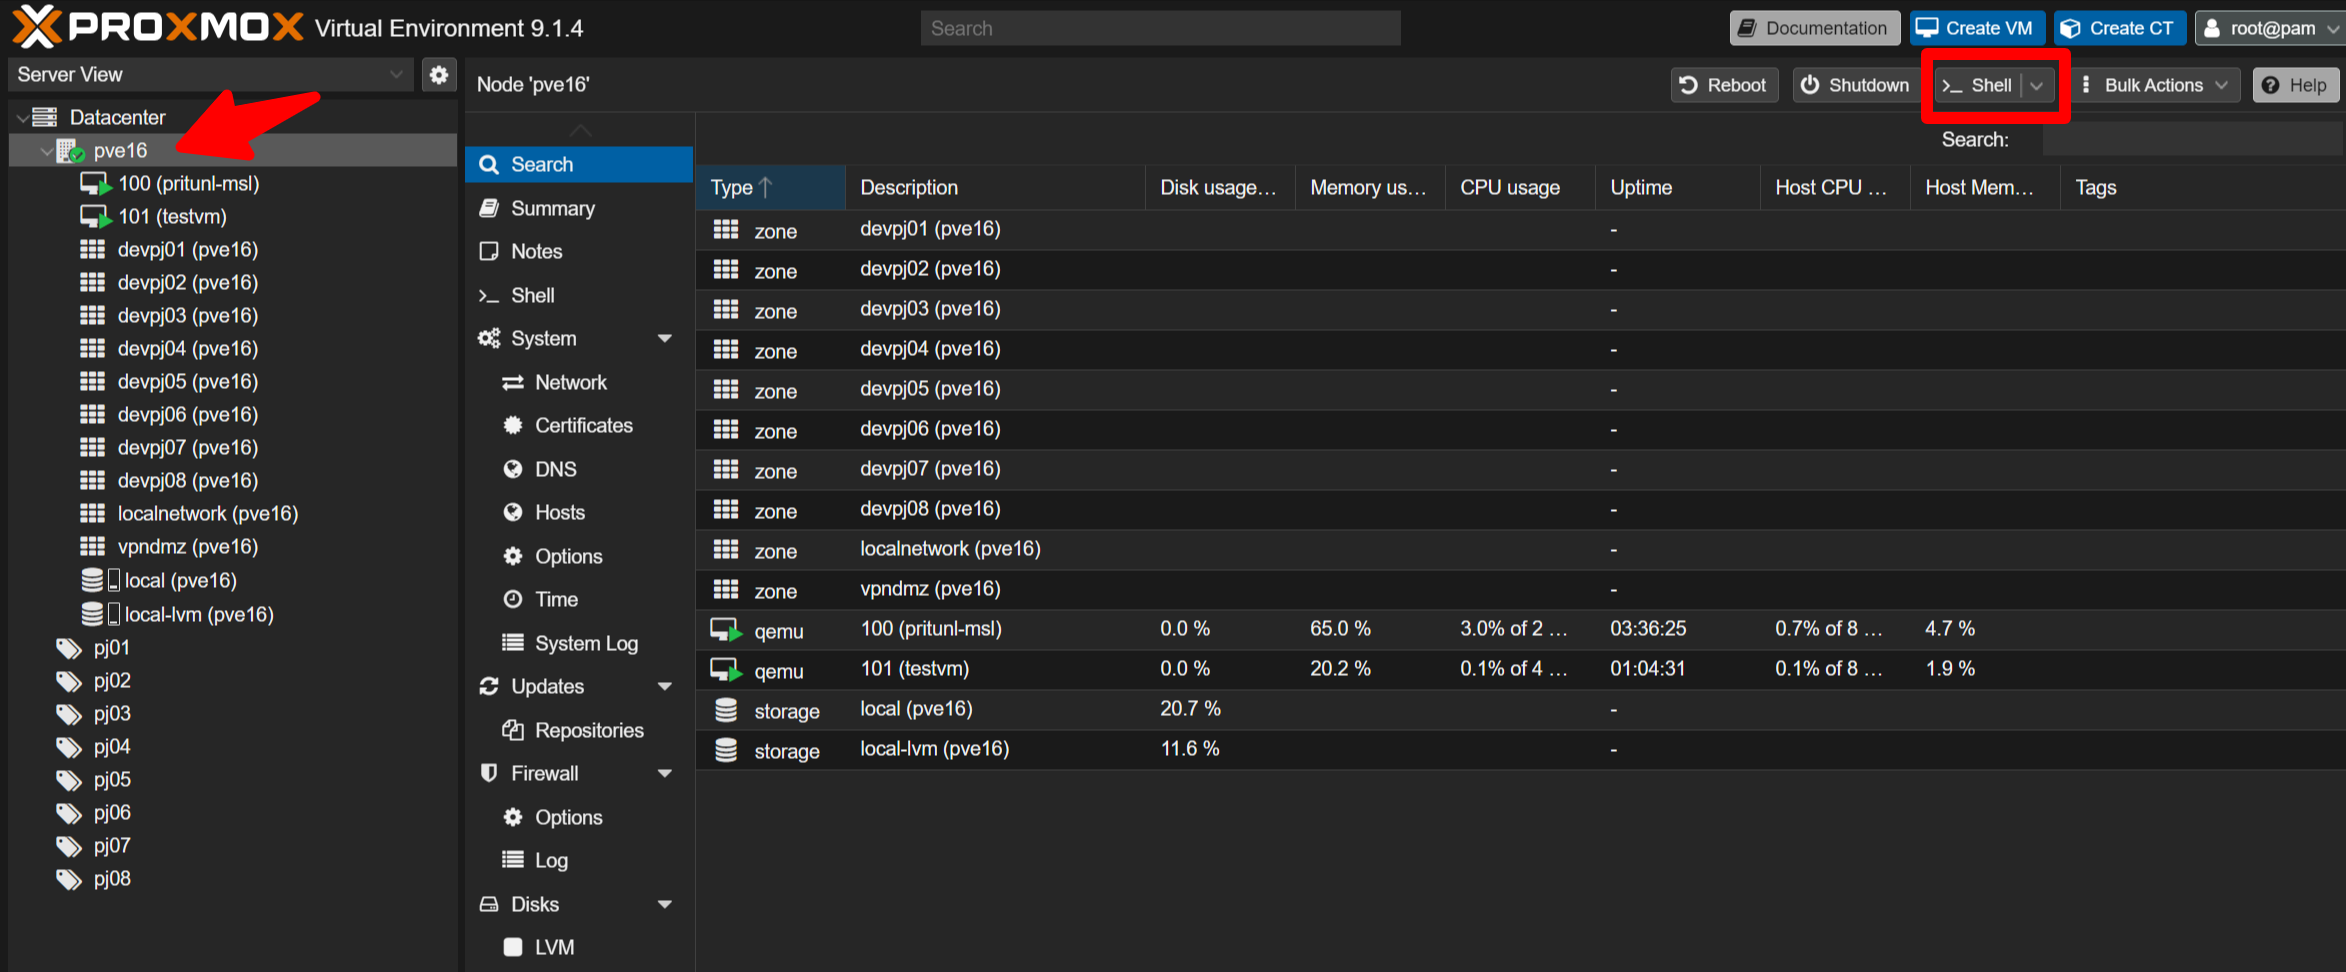
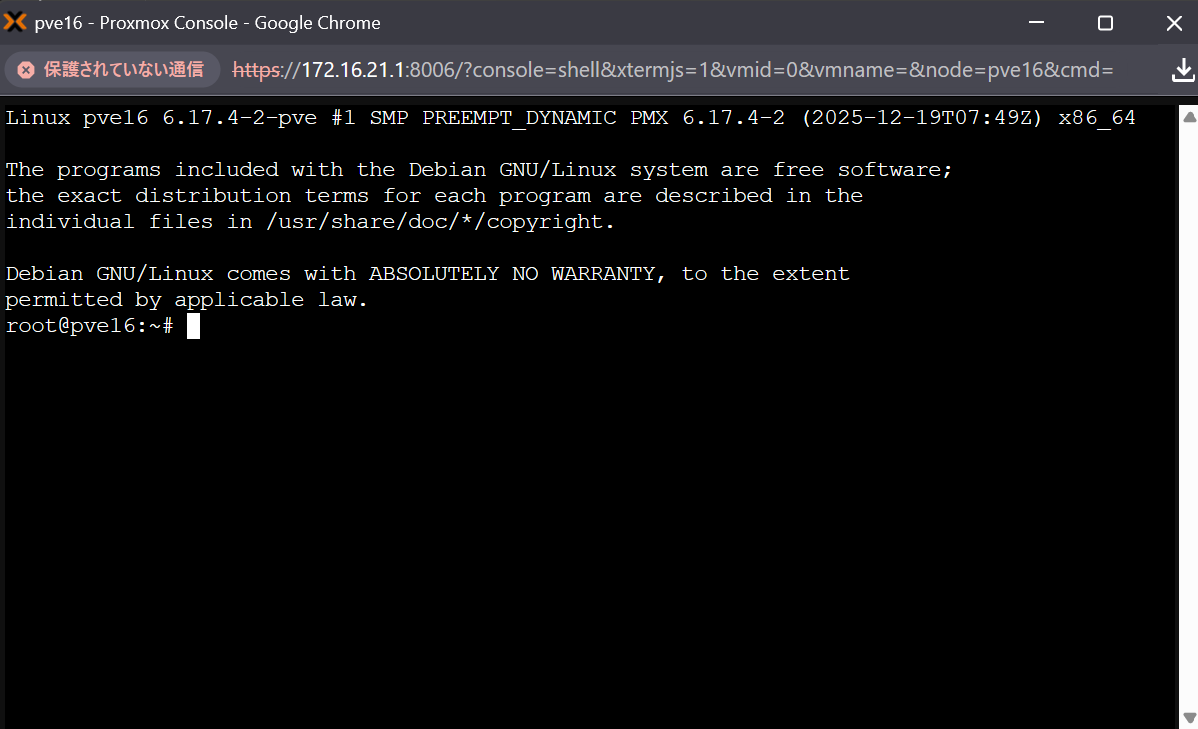
- Run the following commands to install necessary commands for MSL Setup.
apt install -y ipcalc jq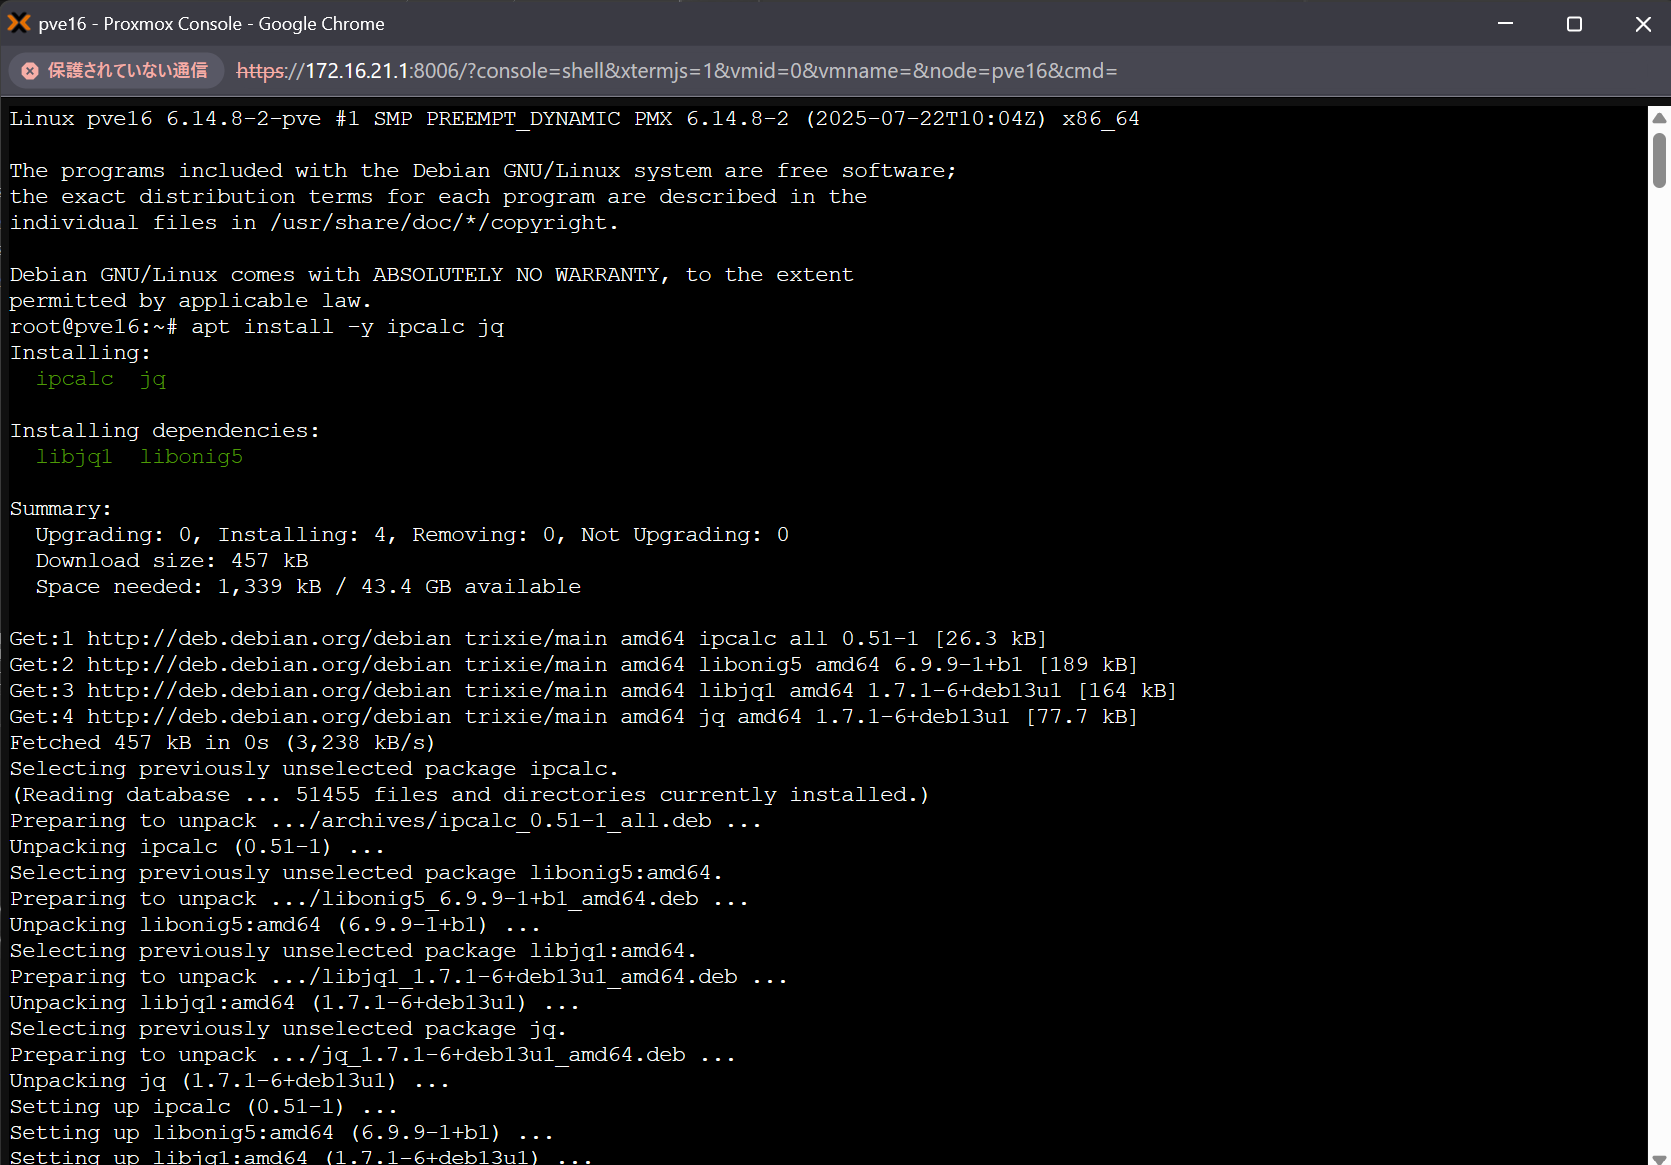
- Run the following commands to experience installing MSL Setup Pro. The installer walks you through IP configuration and then automatically builds the environment in around ten minutes.
cd msl-setup-pro-1.4.5_corporate/
./00_configNetwork.sh
An interactive installer session begins, for example:
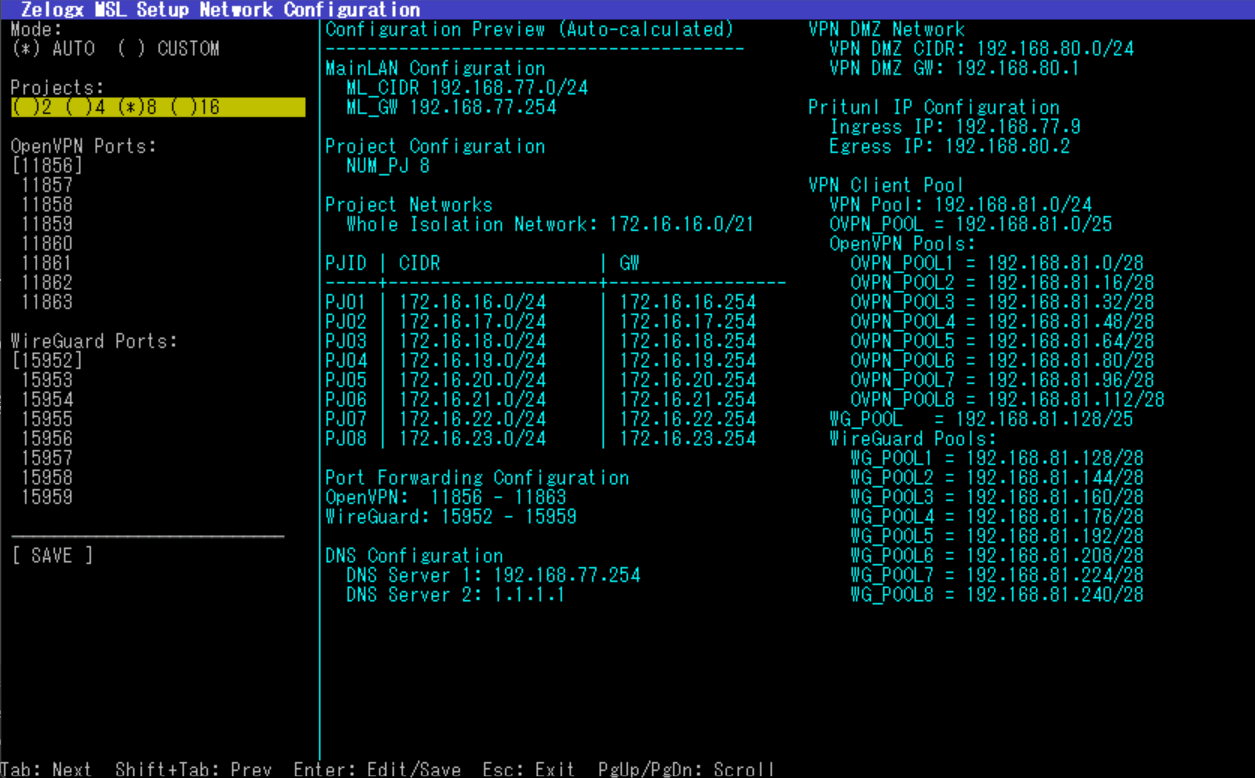
The installer provides sensible default values so subsequent missions run smoothly. Use the values shown by the installer in this demo.
Once you have reviewed the configuration, select [ SAVE ]
- After the shell command above completes, run the following to start building the isolated tenant network.
# Start isolated tenant network build process
./01_networkSetup.sh
The script outputs router configuration instructions requiring manual steps to configure static routes and port forwards:
Manual configuration required: Router Configuration (Manual Steps Required)
Please apply the following settings on your router (values expanded):
 - Static route: destination 172.31.16.0/21 -> gateway 172.16.21.1
 - Port forward (OpenVPN): 11856-11863/UDP -> 172.16.21.9
 - Port forward (WireGuard): 15952-15959/UDP -> 172.16.21.9
After completing router setup, proceed to the next phase

Phase 1 Complete: Network Setup Successful
Next Steps:
  1. Configure your router (follow instructions from previous step)
  2. After router configuration, run:
     ./02_vpnSetup.sh
In the demo environment there is no external router, so you can skip actual router configuration and continue.
If needed you can restore pre-setup state:
./0102_setupNetwork.sh --restore- Next, execute the following command to deploy the Pritunl VPN server:
./02_vpnSetup.shAt the end of the script the console prints URL below. Open it and check the Notes section for the initial Pritunl login username and password.
URL: Proxmox dashboard
You can also restore Pritunl creation if necessary:
./0201_createPritunlVM.sh --destroy- Now, we will move on to the final setup step. Running the shell script below will set up the Self-Care Dashboard.
This allows VPN users to access the Proxmox dashboard and perform actions such as creating, deleting, starting, stopping, snapshotting, and backing up VMs only within the isolated network assigned to them.
./0301_setupSelfCarePortal.shDuring the process, you will be asked interactively which storage should be assigned to the pool. Please press Enter to select all storage options.
- Save the generated Proxmox access accounts shown at the end of the setup — you will use them in Mission 5.
Example output (save these credentials):
Project | Username        | Password
--------|-----------------|----------------------------------
pj01    | pj01Admin@pve   | EmaSeVzHeqoQnuuY
pj02    | pj02Admin@pve   | 5U7MV0QfaTHkO5af
...     | ...             | ...
This completes the MSL Setup installation. Proceed to the next steps.
M2-3 - Verify the created isolated networks
Open Datacenter -> PVE16 -> Notes in the Proxmox dashboard to view an automatically generated network diagram.

M2-4 Check the Operation Guide
In the left tree of the Proxmox dashboard, select Datacenter -> PVE16 -> 113 (pritunl-msl) -> Summary.
There is a Notes section in the upper-right area of the screen.
You can check the initial Pritunl password there.
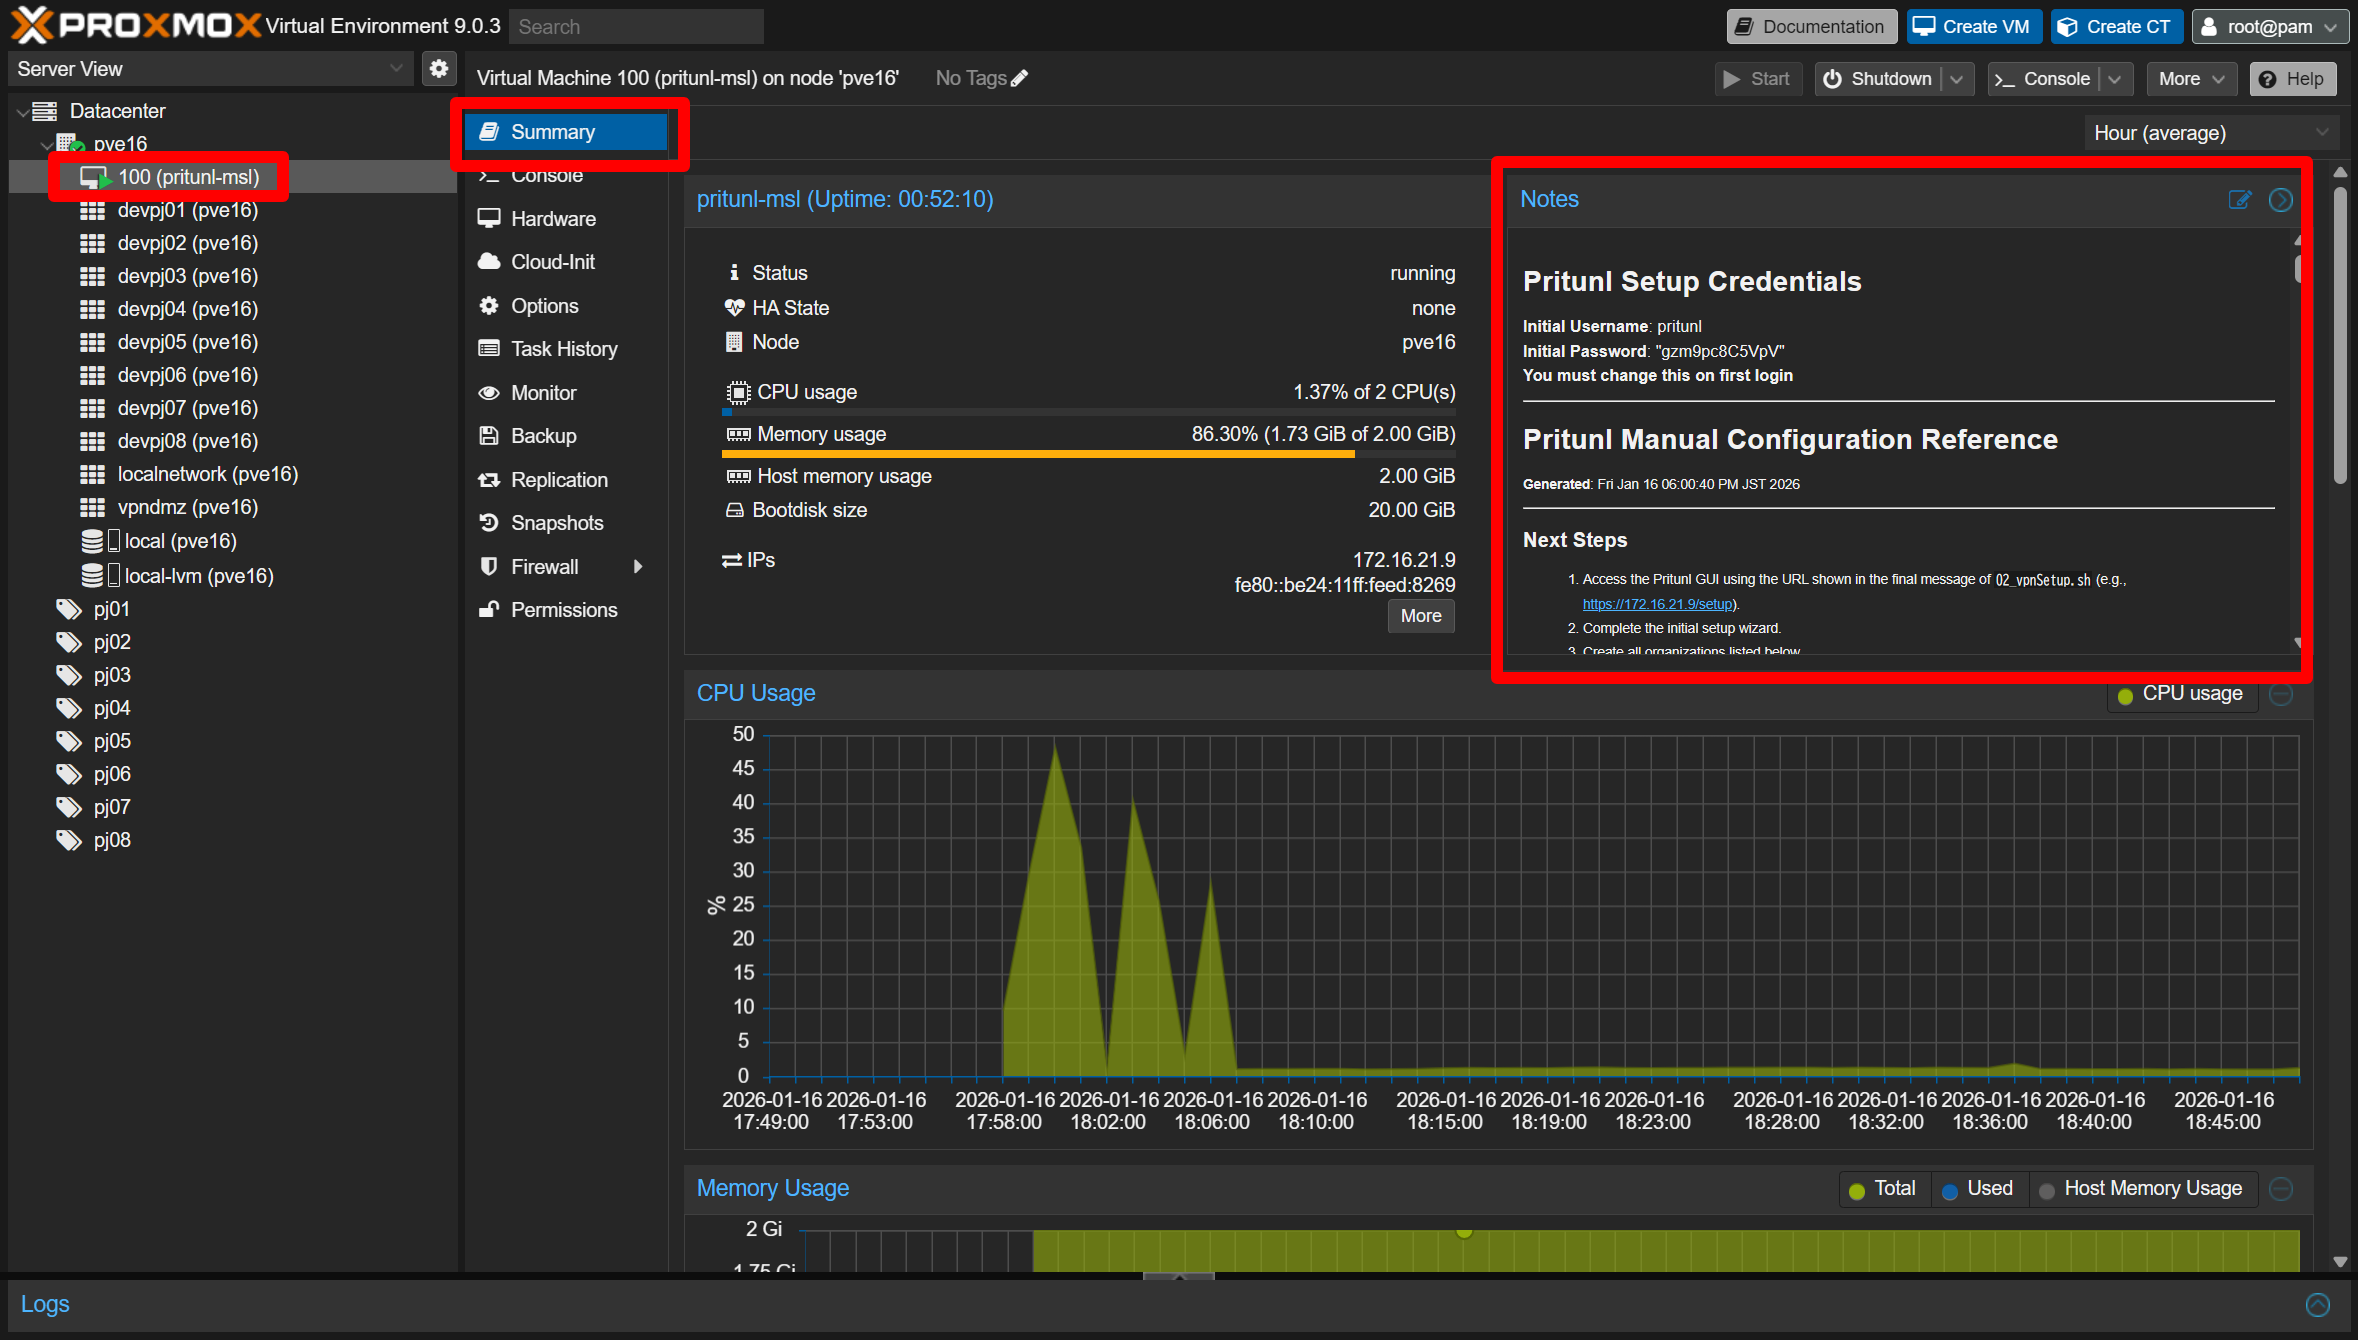
Pritunl Setup Credentials
Initial Username: pritunl
Initial Password: xxxxxxxxxxxx
Below that, you will also see the Day 1 operation guide shown as the Pritunl Manual Configuration Reference.
We will follow these steps next.
Please also make sure that the URL for accessing the Pritunl dashboard is displayed as a link.
M2-5 - Create organizations and users in Pritunl
M2-5-1 - Log in
Open the Pritunl URL (for example: https://172.16.21.9). Use the initial credentials shown earlier (username: pritunl, password: the one displayed in Notes). Change the password if you like.
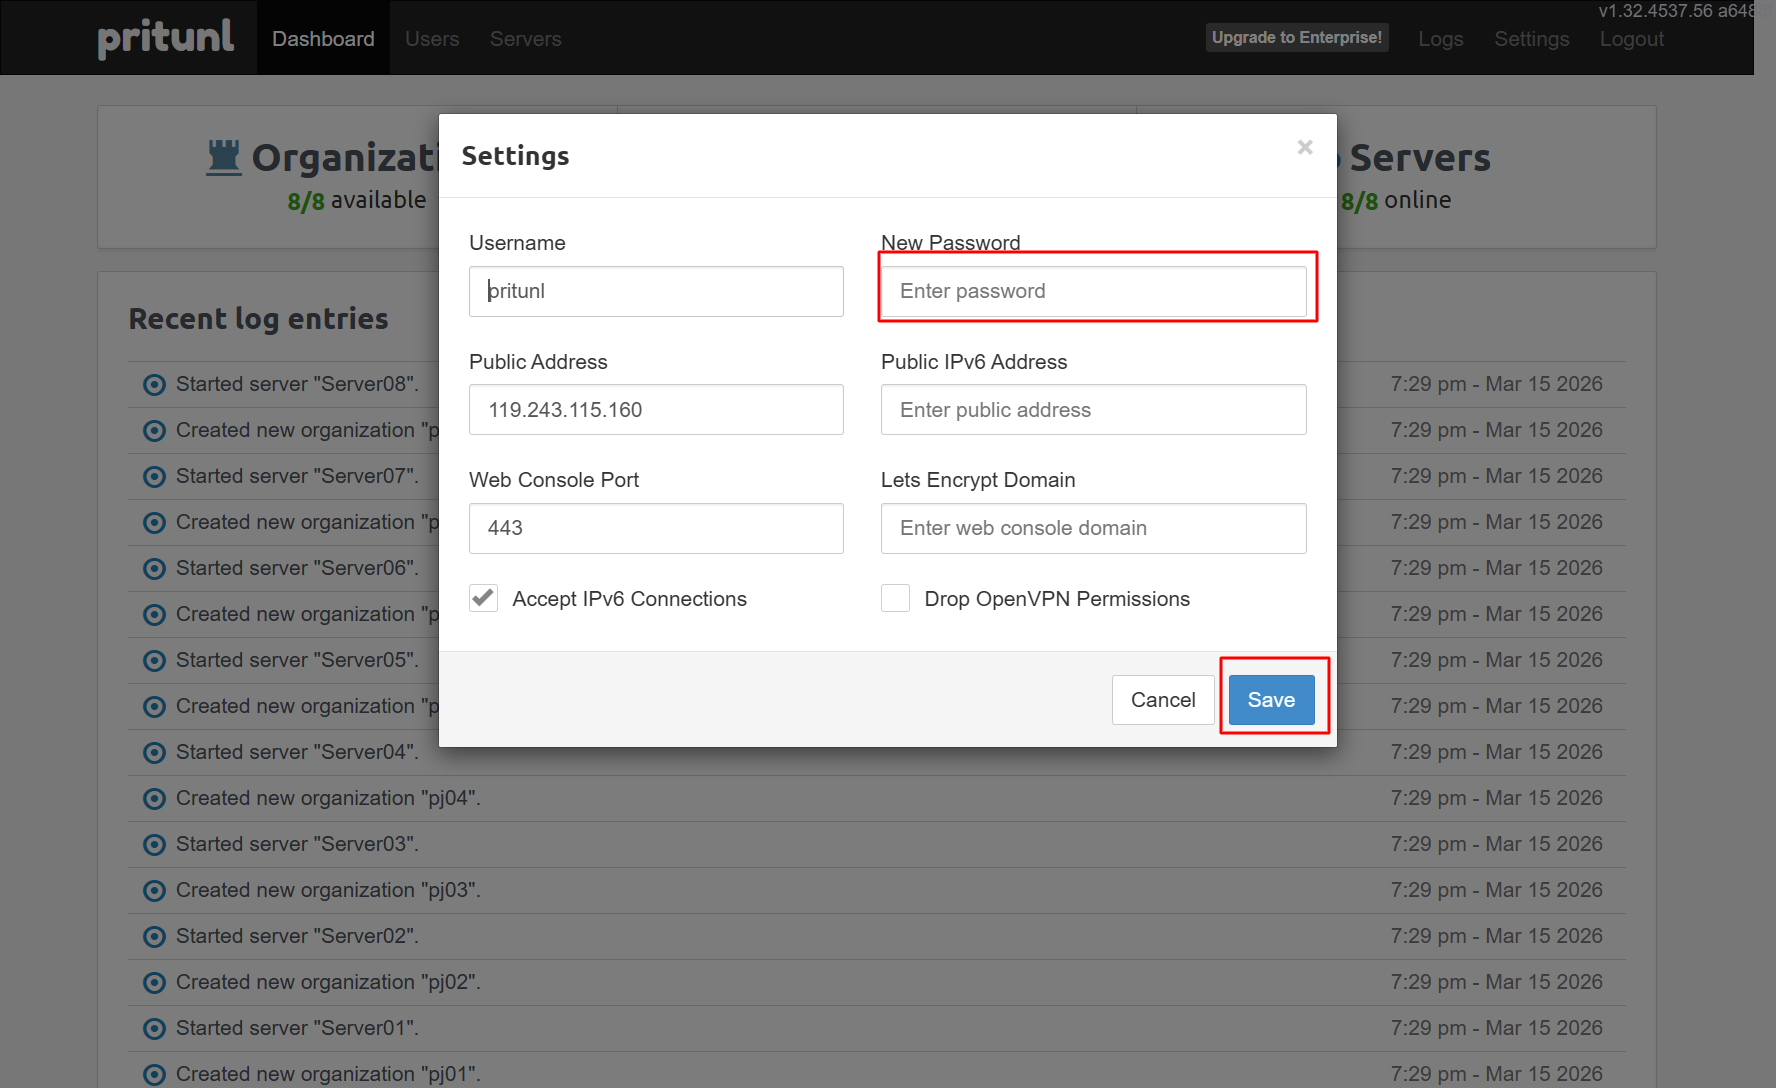
M2-5-2 - Confirm organizations
Open the Users tab and see organizations automatically registered by MSL Setup. The organizations named pj01, pj02, … pj08 are match the isolated tenant networks.
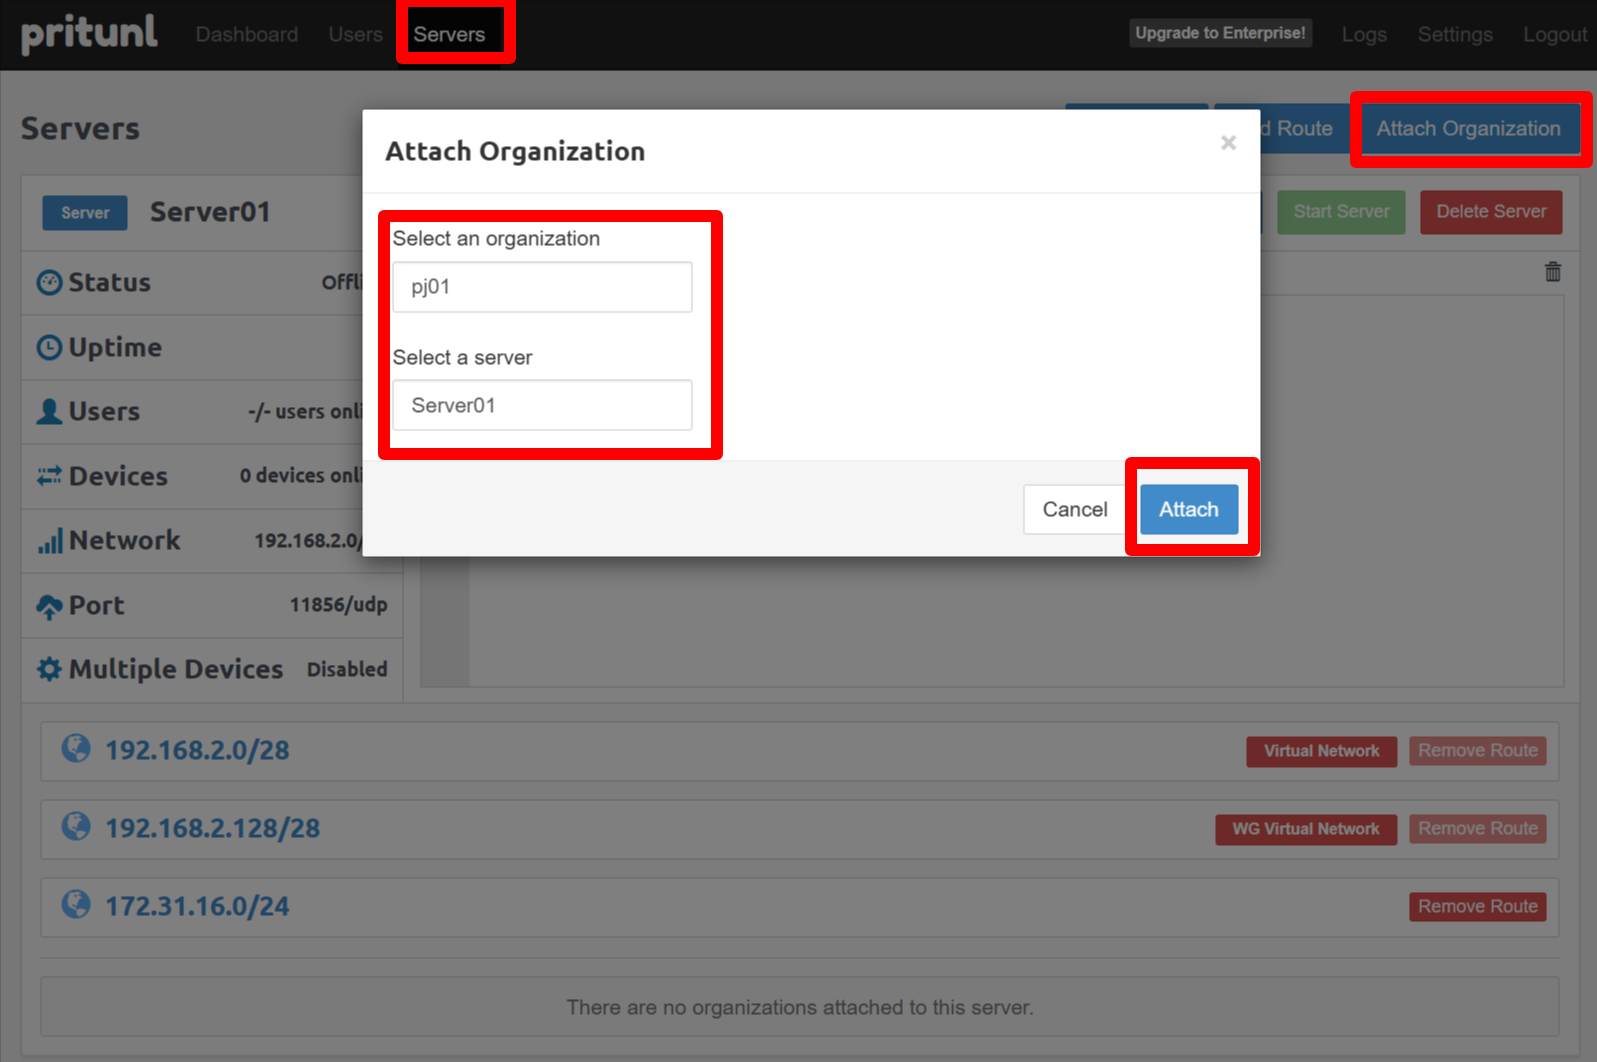
You can create your own organization if you need. Attach organization to server after create it.
M2-5-3 - Add VPN users
Now, let’s add a VPN user who can access tenant pj01. Add a user (for example: testuser1) and assign them to an organization such as pj01.
M2-5-4 - Distribute VPN profiles
You can see screen below after create user.
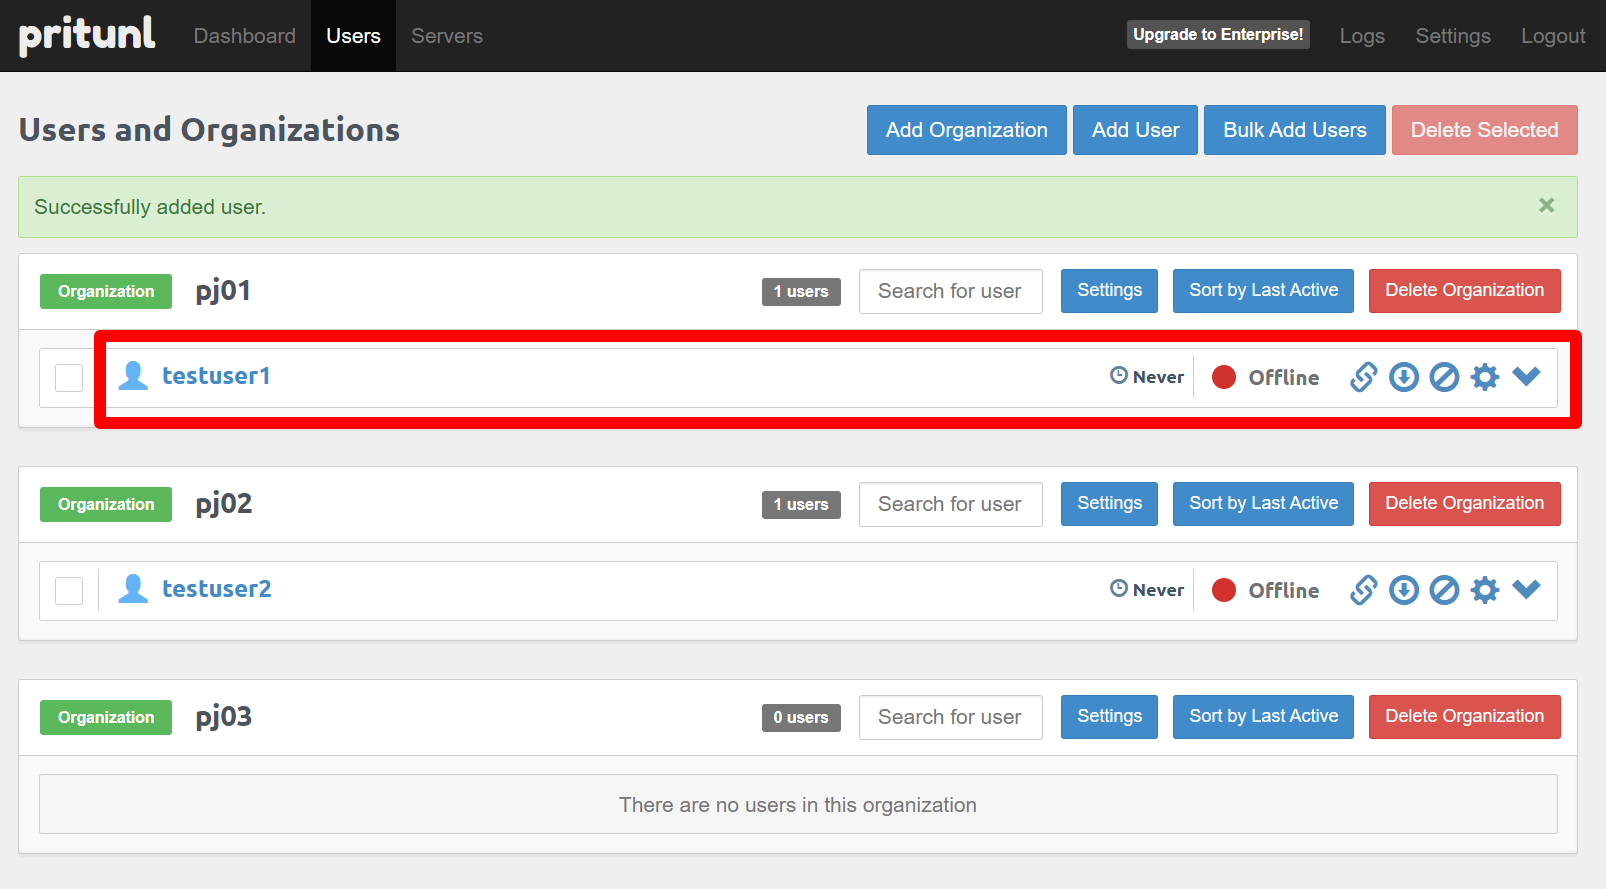
Click “Click to download profile” next to a user to download a .tar package containing the VPN client profile. Send this profile to remote users securely. They can import it into Pritunl or OpenVPN to connect — the same method you used to connect to the demo.
M2 Wrap-up
What this mission demonstrated
- Ease of installing MSL Setup and speed of isolated environment creation
- Network diagrams and operation guides appear in Proxmox Notes after setup
- Easy initial setup of Pritunl VM created by MSL Setup
- Simple VPN user/profile management via Pritunl
- You can close Pritunl GUI.
— Mission2 Accomplished! —
Mission 3 - Build a VM inside an isolated environment. Est. time: 10 minutes
If you have experience creating VMs on Proxmox you may skip non-essential parts. Key points:
- In the General tab, set the Resource Pool to the target isolated project.
- In the Network tab, set the NIC bridge to the isolated network bridge (vnetpjXX).
M3-1 - Create a VM
Create a VM in the pj01 isolated network.
M3-1-1 - (ISO download step removed)
M3-1-2 - VM creation
Datacenter -> pve16 -> Create VM.
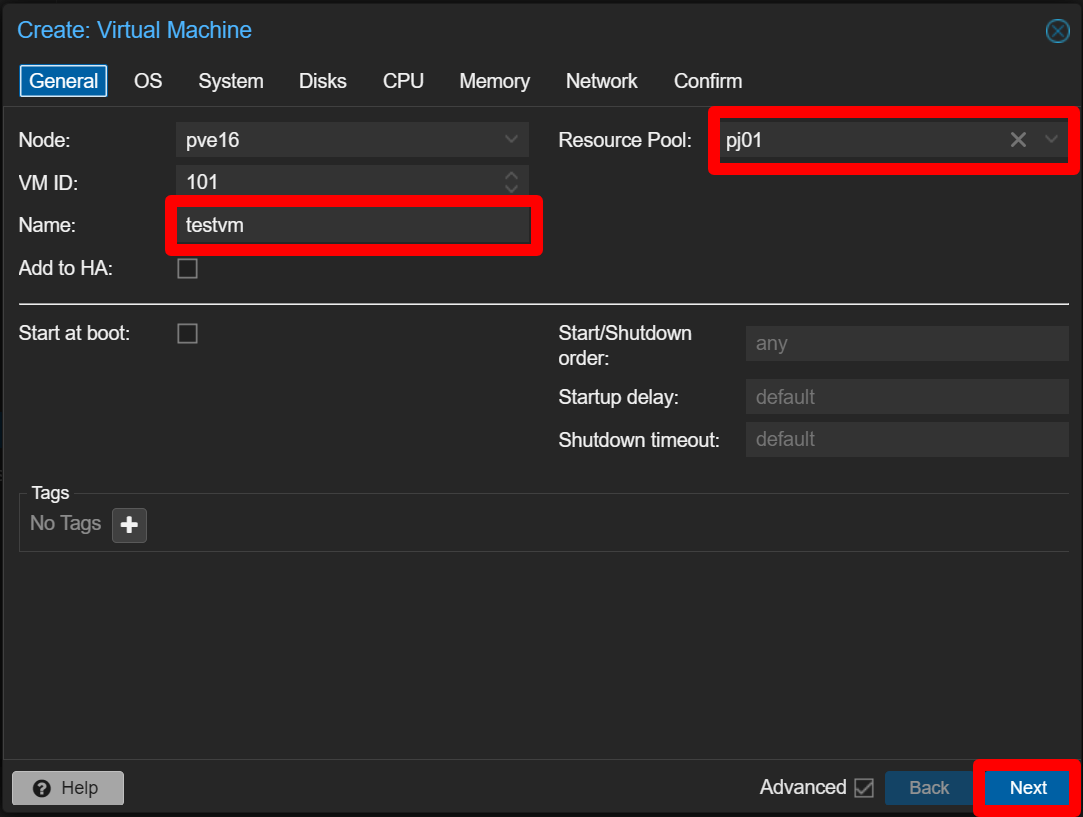
M3-1-2-1 General
Set:
Name: testvm
Resource Pool: pj01 <— Important: assign to the pj01 pool (isolated project)
M3-1-2-2 OS
Select the ISO image: ubuntu-24.04.3-live-server-amd64.iso

M3-1-2-3 System
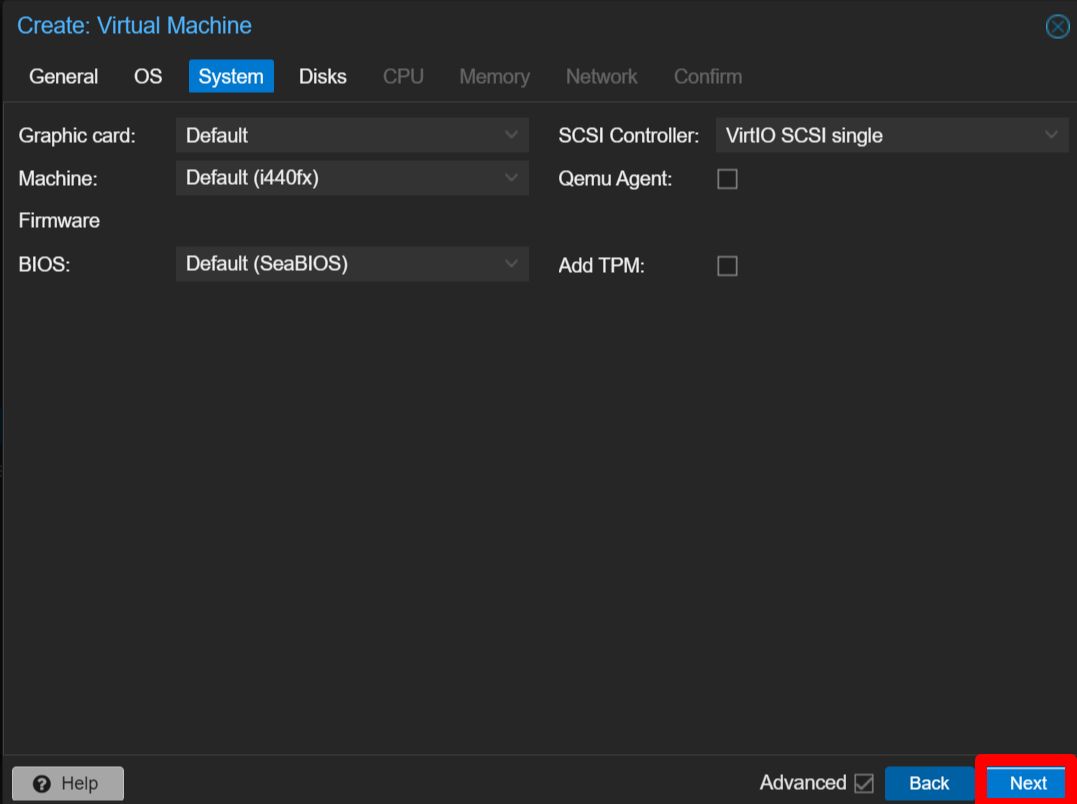
Click Next.
M3-1-2-4 Disks
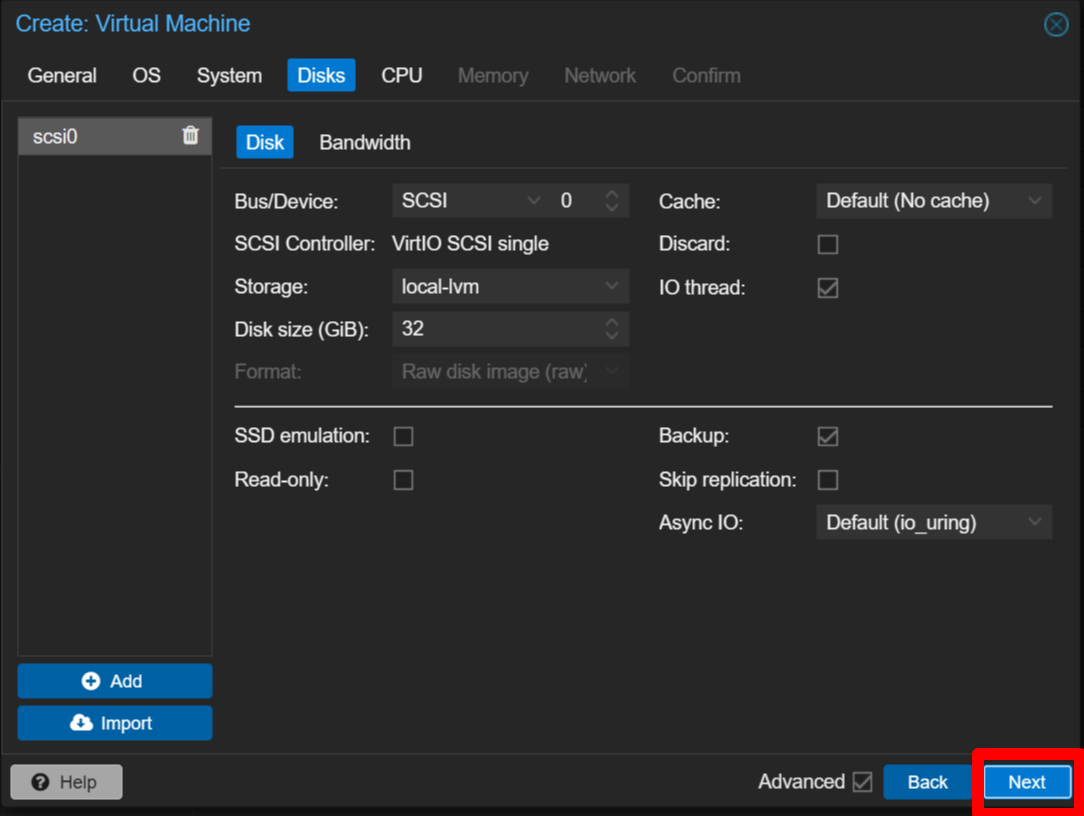
Click Next.
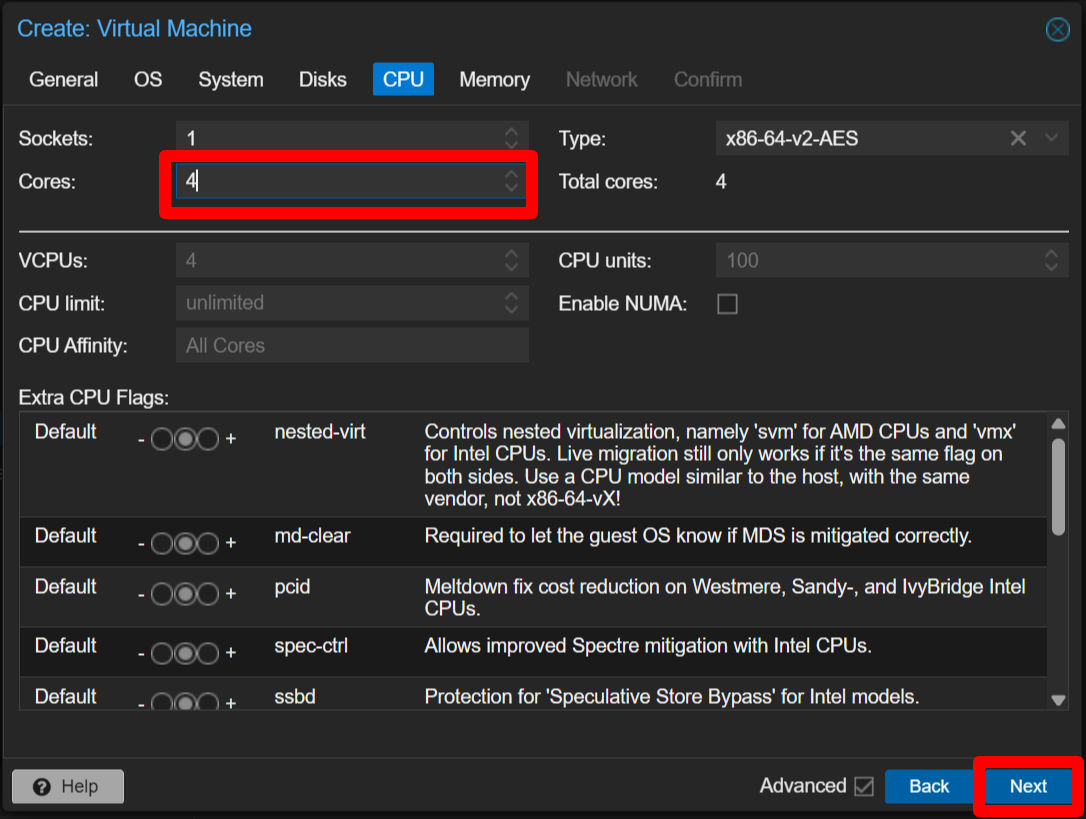
M3-1-2-5 CPU
Set Cores: 4
M3-1-2-6 Memory
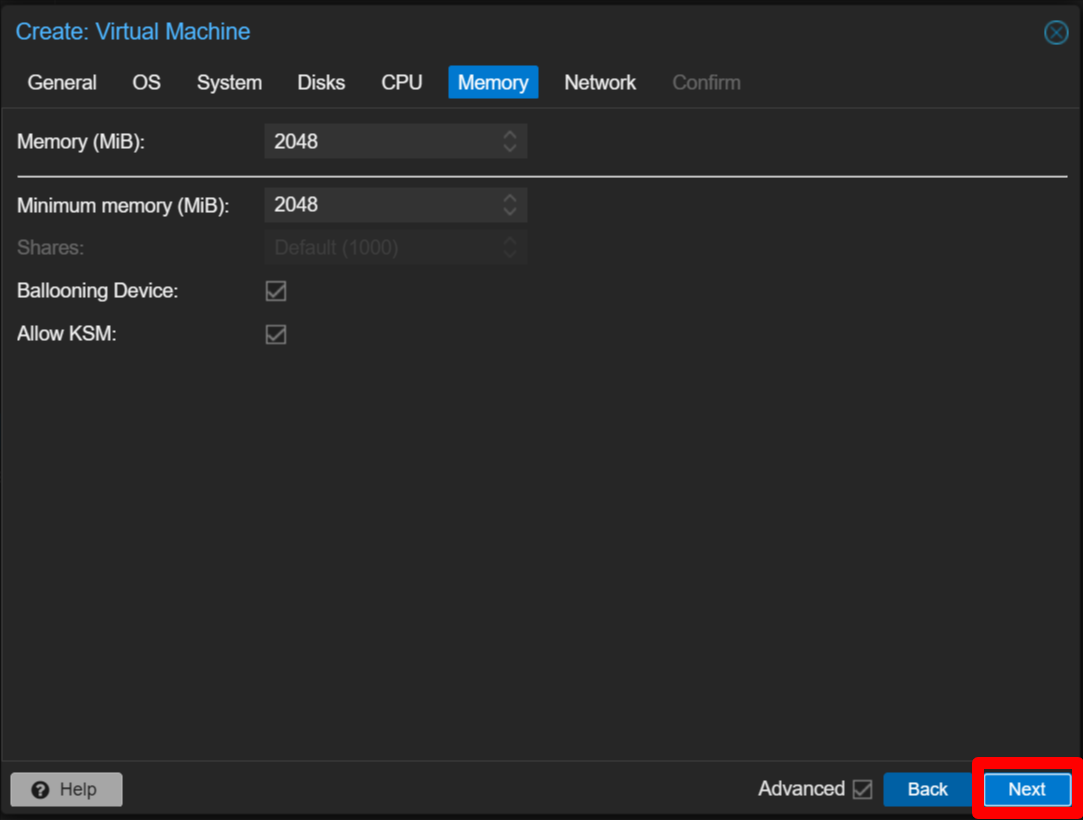
Click Next.
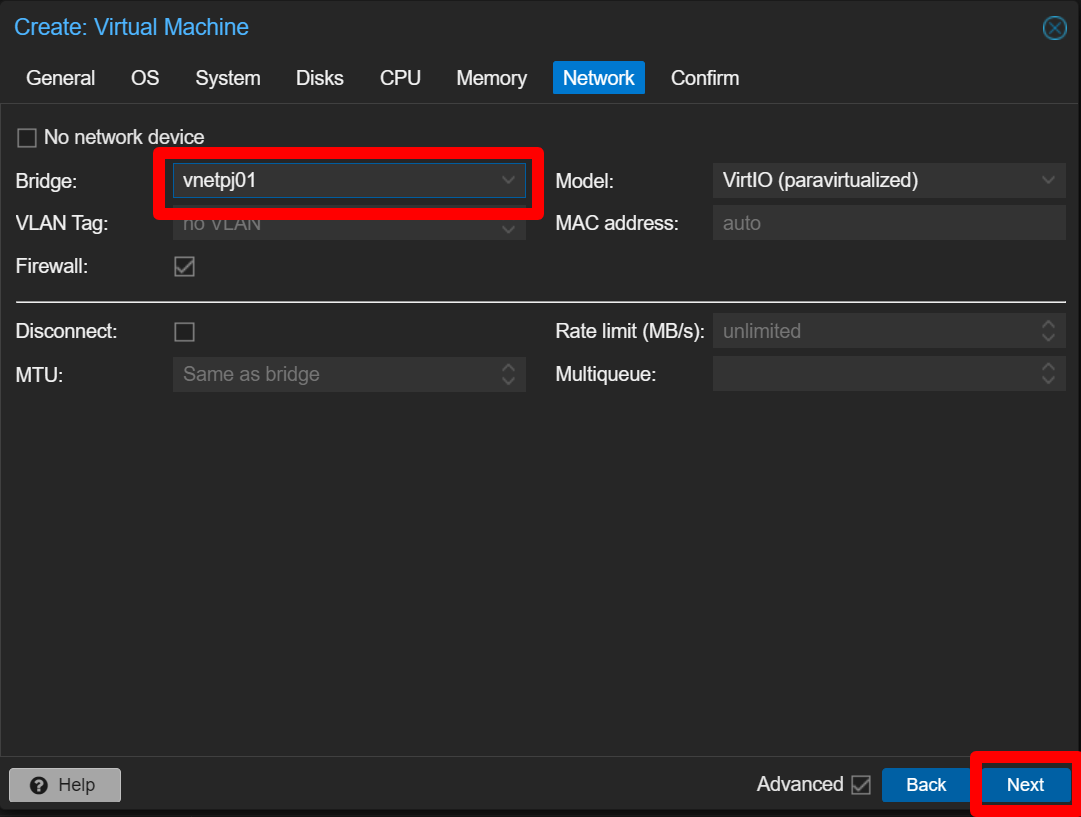
M3-1-2-7 Network
Set Bridge: vnetpj01 <— Important: attach the NIC to the isolated bridge vnetpj01
M3-1-2-8 Confirm
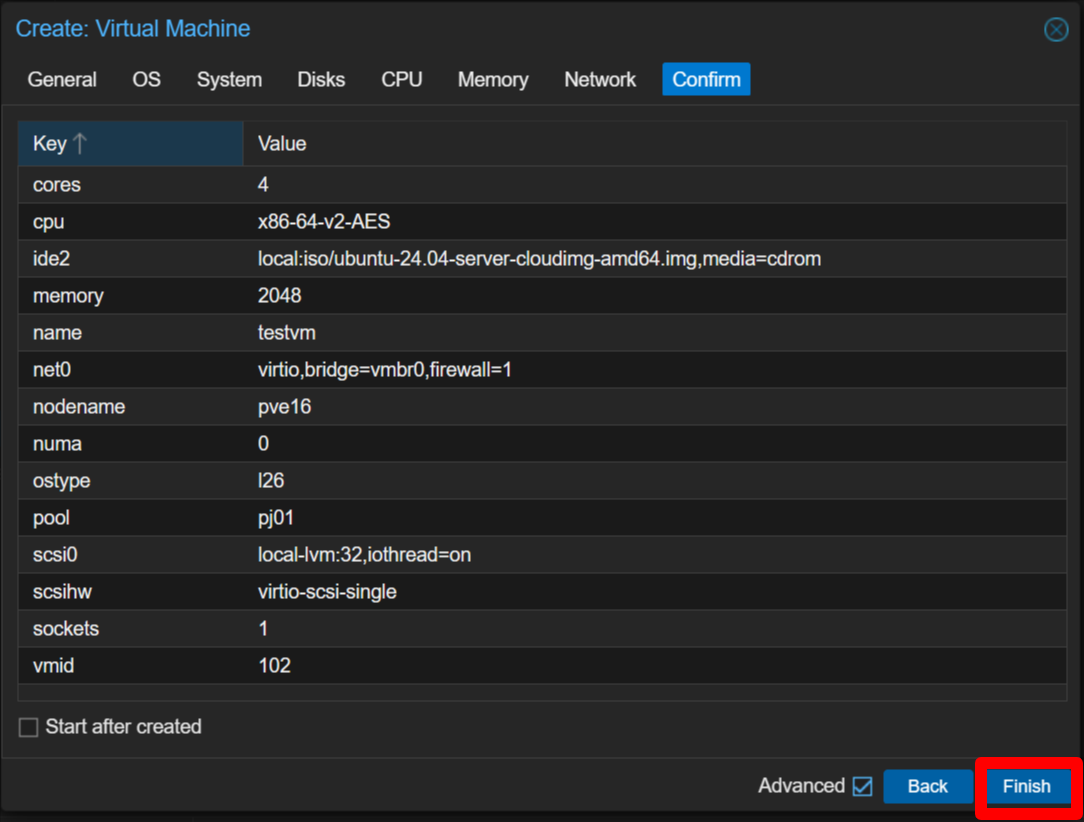
Click Finish.
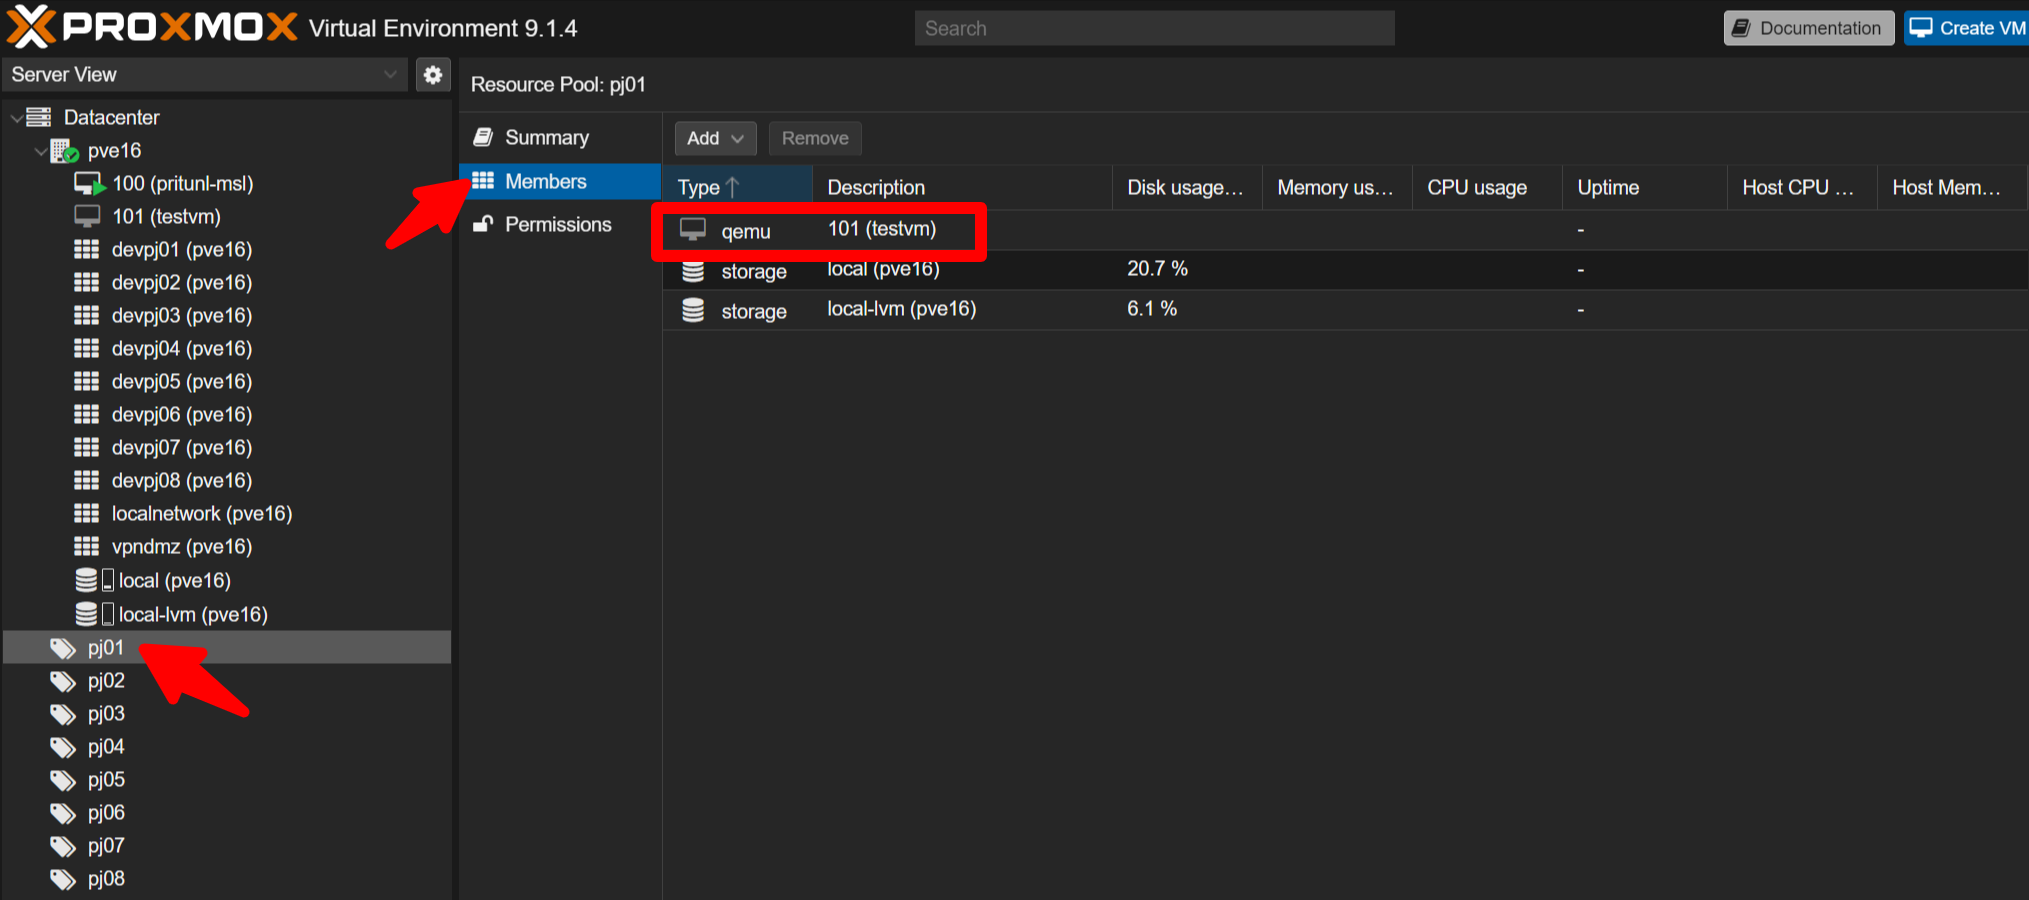
M3-1-3 - Verify the VM
Confirm testvm appears under Datacenter -> pve16 and that testvm (114) is listed under Datacenter -> pve16 -> pj01 -> Members.
M3-2 - Install the OS
You may skip this step if you’re short on time. If you install the OS, assign a static IPv4 address rather than using DHCP. For pj01 use the 172.31.16.0/24 network range.
Example configuration:
IPv4 method: Manual
Subnet: 172.31.16.0/24
Address: any address between 172.31.16.1 and 172.31.16.253
Gateway: 172.31.16.254
# Avoid addresses used later in missions: 172.31.16.200 and 172.31.16.201
Name: Server: 1.1.1.1 (use 1.1.1.1 for this mission)
After installation remove the installation media: Datacenter -> pve16 -> VM101(testvm) -> Hardware -> CD/DVD Drive -> Do Not use any media.
M3 Wrap-up
What this mission demonstrated
- How to create a VM in an isolated network by assigning the proper pool and vnet bridge
— Mission3 Accomplished! —
Mission 4 - Confirm complete isolation: VMs in different environments cannot communicate. Est. time: 20 minutes
M4-1 - Overview
Run automated provisioning to create three VMs:
- demo-vm11 and demo-vm12 in pj01
- demo-vm2 in pj02
Open the Proxmox console as shown earlier (Datacenter -> pve16 -> >_ Shell).
M4-2 - Automatically create the three VMs
Run:
cd /root/msl-setup-pro-1.4.5_corporate/
./demo_create_vm11.sh
./demo_create_vm12.sh
./demo_create_vm2.sh
This takes about a minute.
These provisioning scripts are demo-specific and not part of the general product.
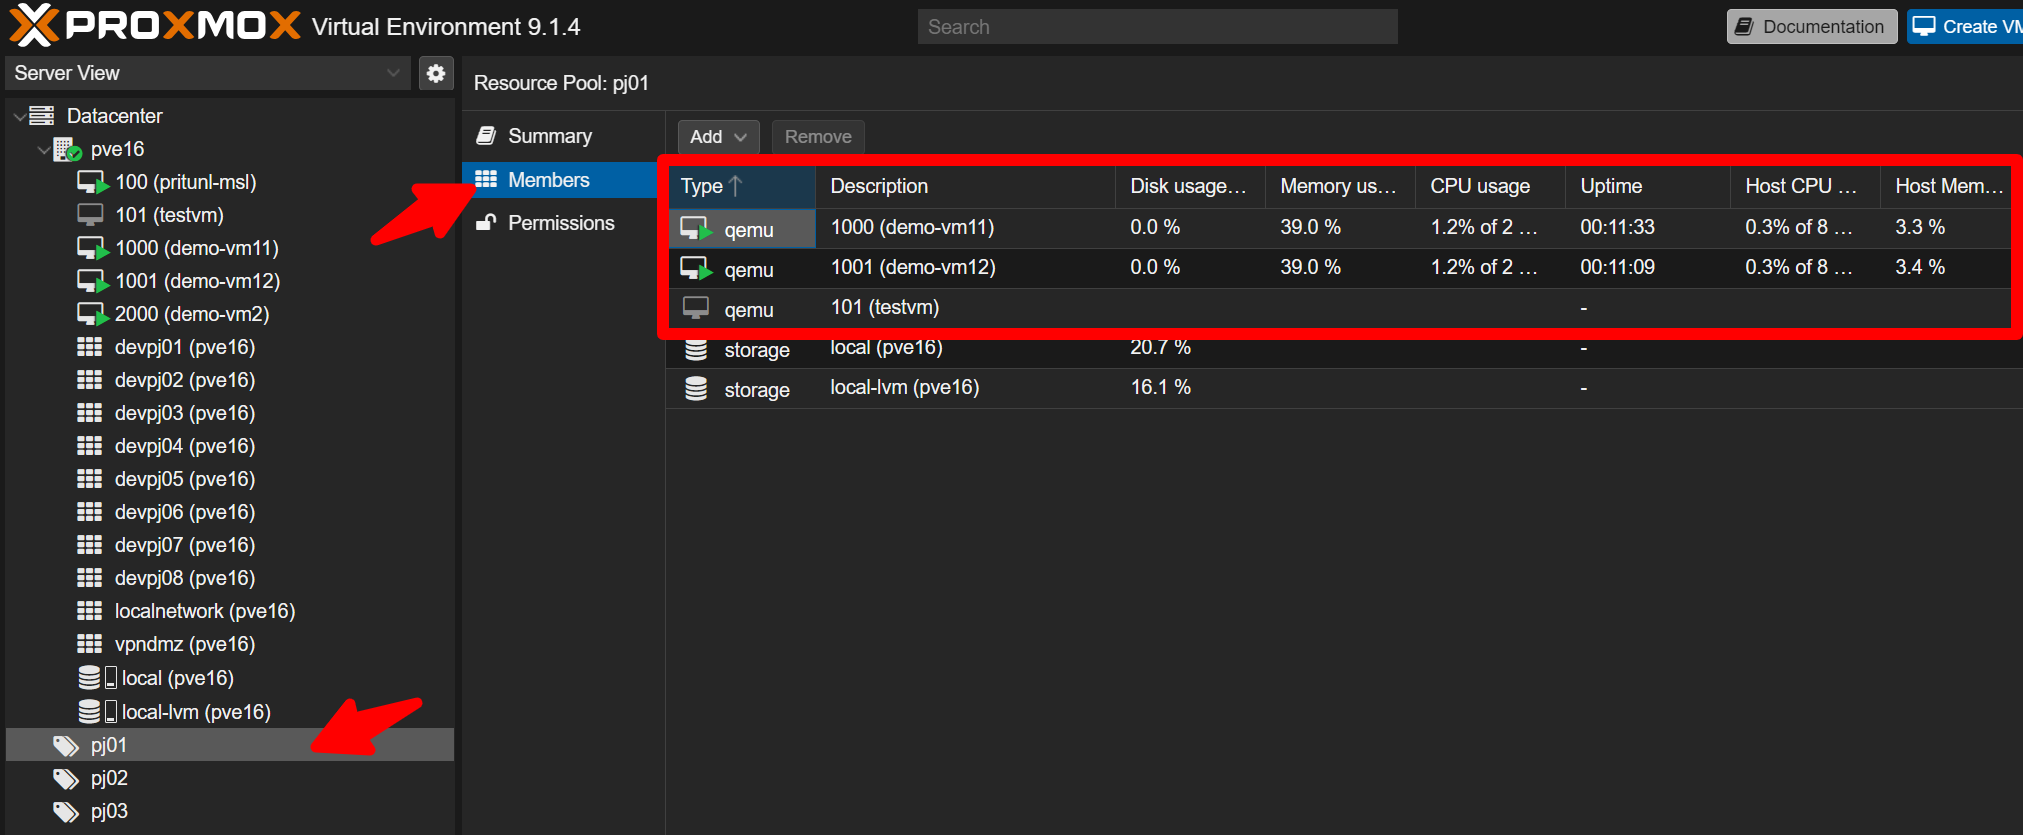
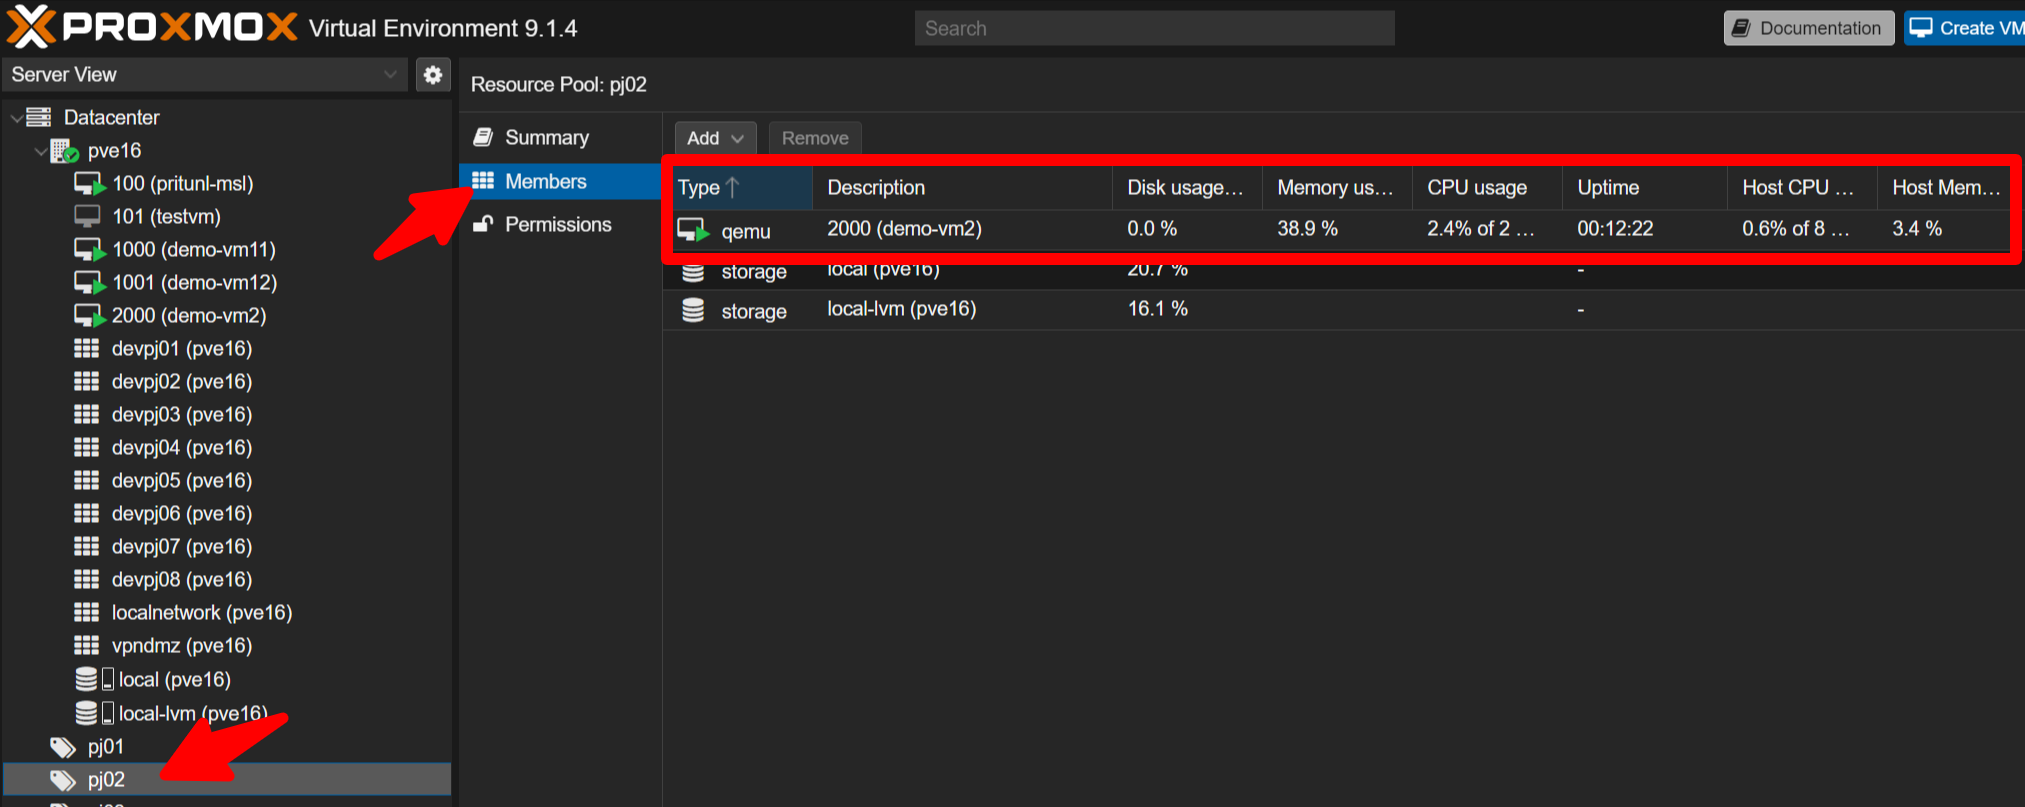
M4-3 - Verify created VMs
Check Datacenter -> pve16 for:
- 1000 (demo-vm11)
- 1001 (demo-vm12)
- 2000 (demo-vm2)
Confirm demo-vm11 and demo-vm12 belong to pj01 members, and demo-vm2 belongs to pj02 members.
M4-4 - Connectivity tests
Open the console for VM 1000 (demo-vm11). Login:
User: ubuntu
Password: zelogx
From VM11, verify connectivity to VM12 (same project):
ping 172.31.16.201 # VM12 addressYou should see replies indicating success.
Then verify VM11 cannot reach VM2 (different project):
ping 172.31.17.200 # VM2 addressThis should fail (no replies).
Also confirm you can reach the gateway in the same project:
ping 172.31.16.254 # Project gatewayAll three VMs use the same credentials. Feel free to test reverse pings, firewall status, and ARP tables if desired.
M4 Wrap-up
What this mission demonstrated
- VMs within the same isolated network can communicate with each other
- VMs in different networks cannot communicate
— Mission4 Accomplished! —
Mission 5 - Experience the Proxmox self-care dashboard. Est. time: 20 minutes
Each isolated environment provides its own Proxmox dashboard. Example URLs (accessible from MainLAN in this demo):
- pj01: https://172.31.16.254:8006
- pj02: https://172.31.17.254:8006
- pj03: https://172.31.18.254:8006
- pj04: https://172.31.19.254:8006
- pj05: https://172.31.20.254:8006
- pj06: https://172.31.21.254:8006
- pj07: https://172.31.22.254:8006
- pj08: https://172.31.23.254:8006
Use the pj01 Admin credentials displayed at the end of M2-2 to log in to pj01 (realm: “Proxmox VE authentication server”).
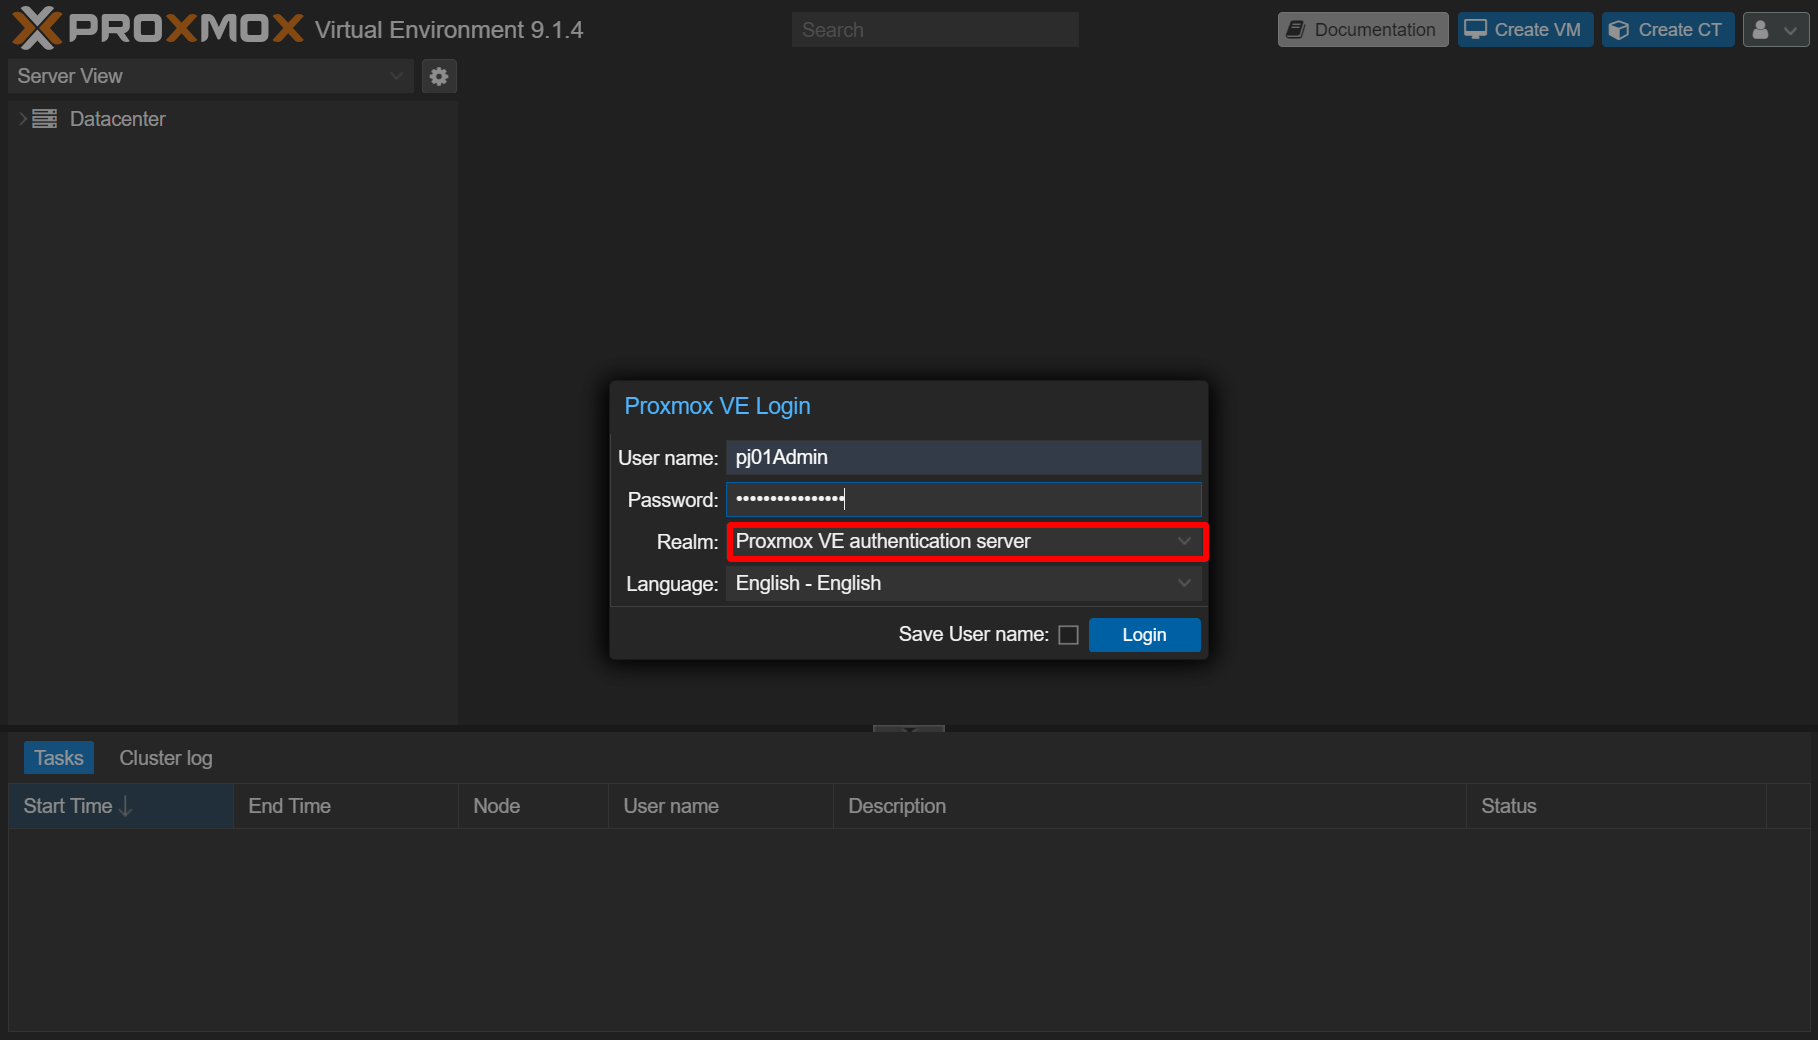
After login, check screen below.
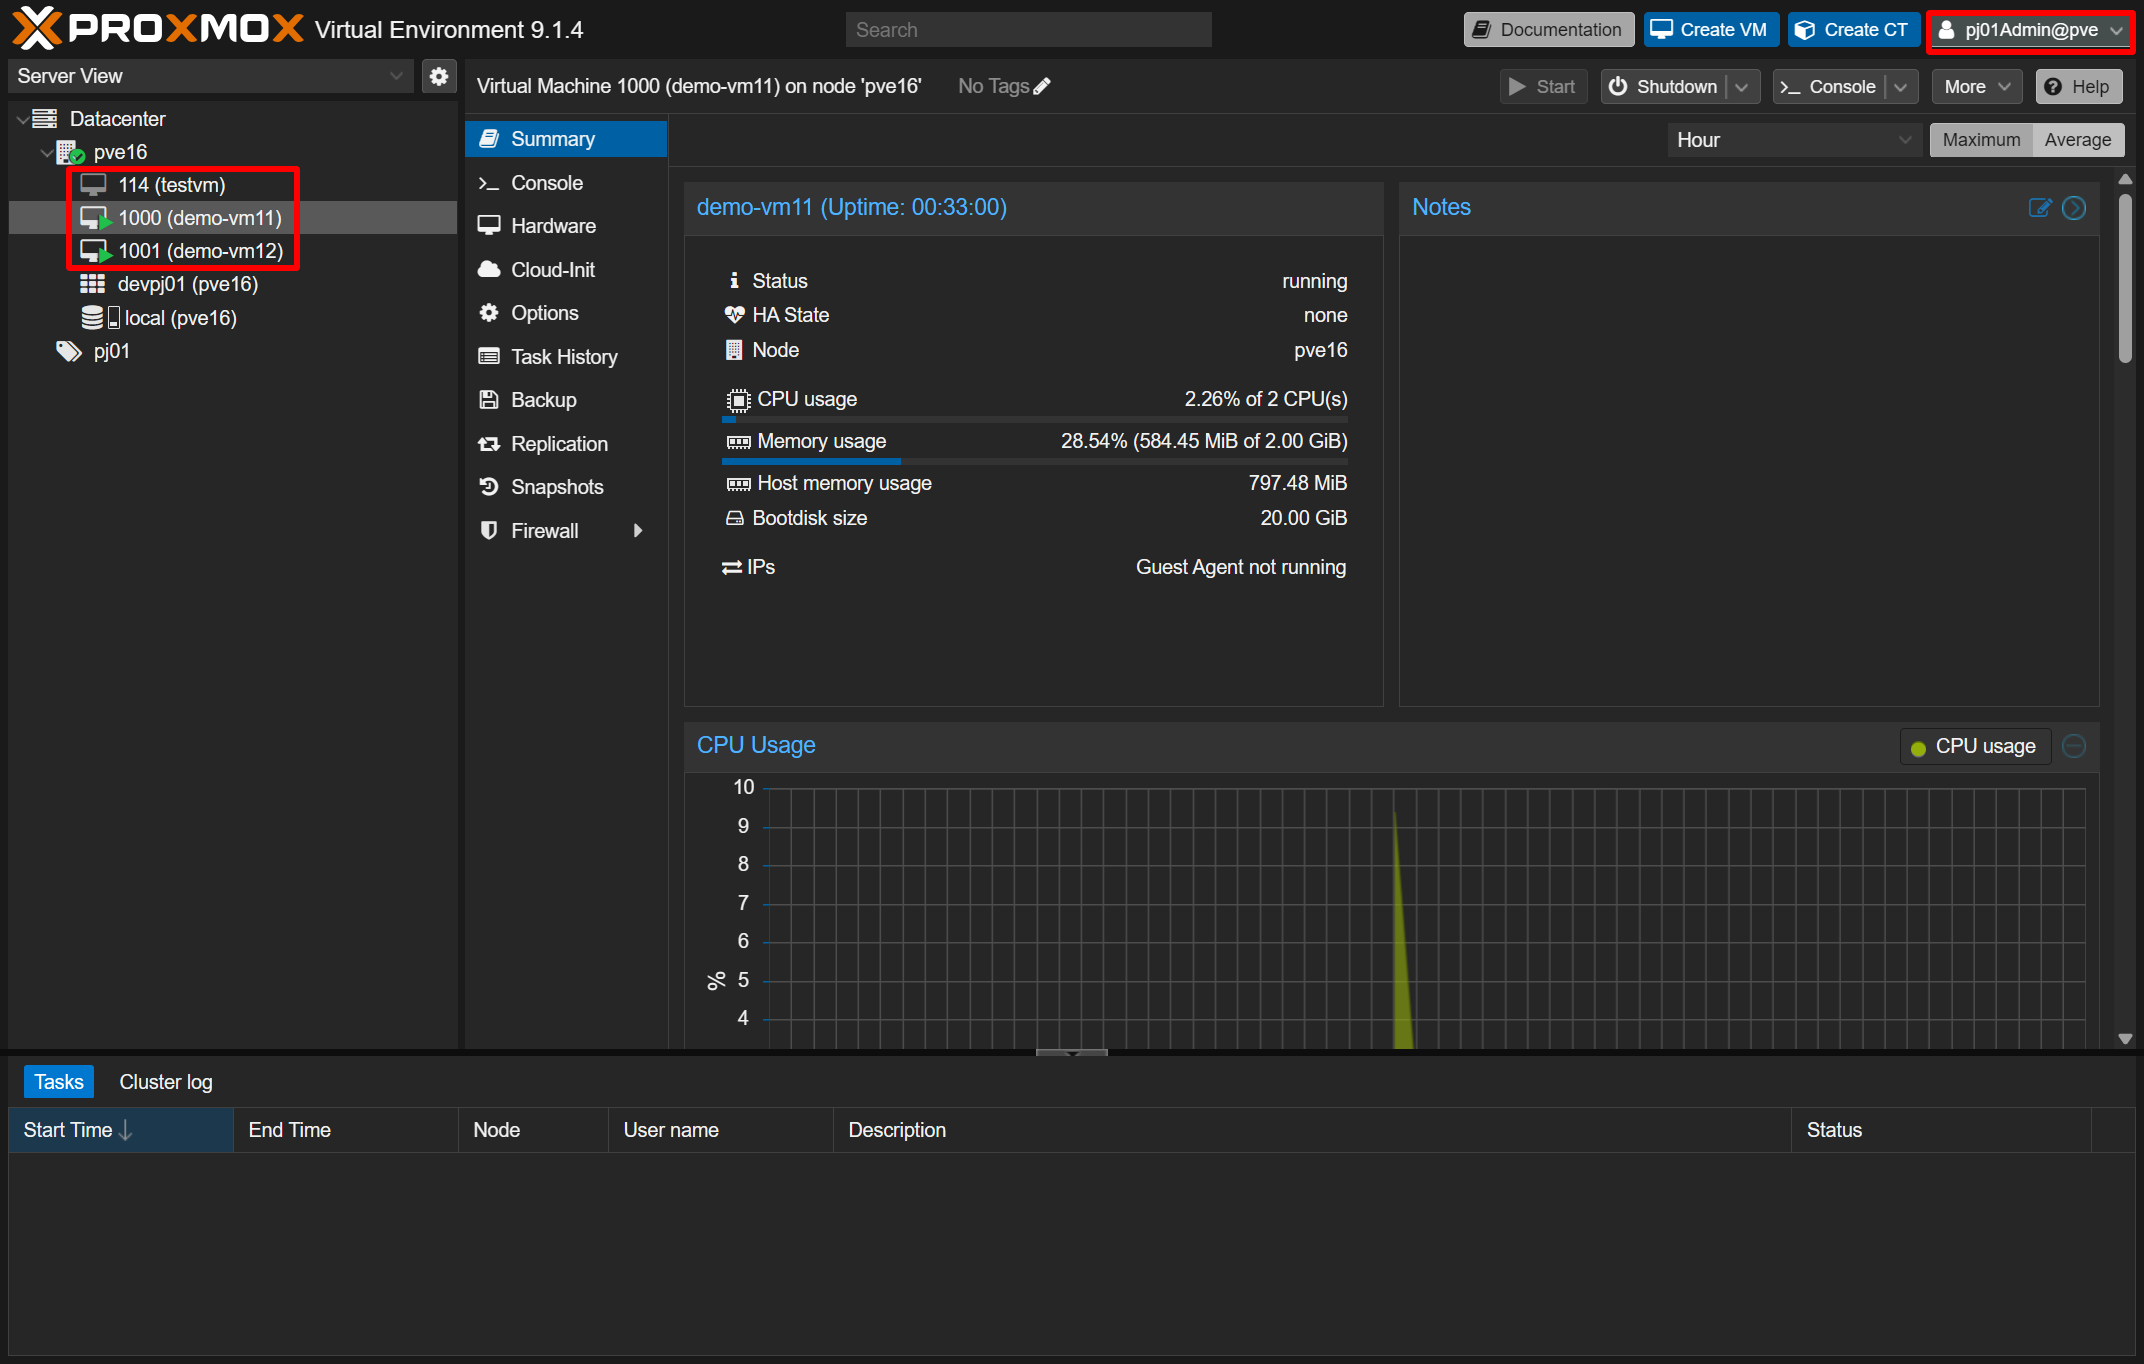
You will see only the VMs that belong to that project; shared VMs such as the Pritunl VM (on vmbr0) are not shown. For pj01 you should see:
- 114 (testvm) — may be absent if skipped
- 1000 (demo-vm11)
- 1001 (demo-vm12)
The project admin can start/stop VMs, manage snapshots and backups — but cannot access shared VMs outside the project.
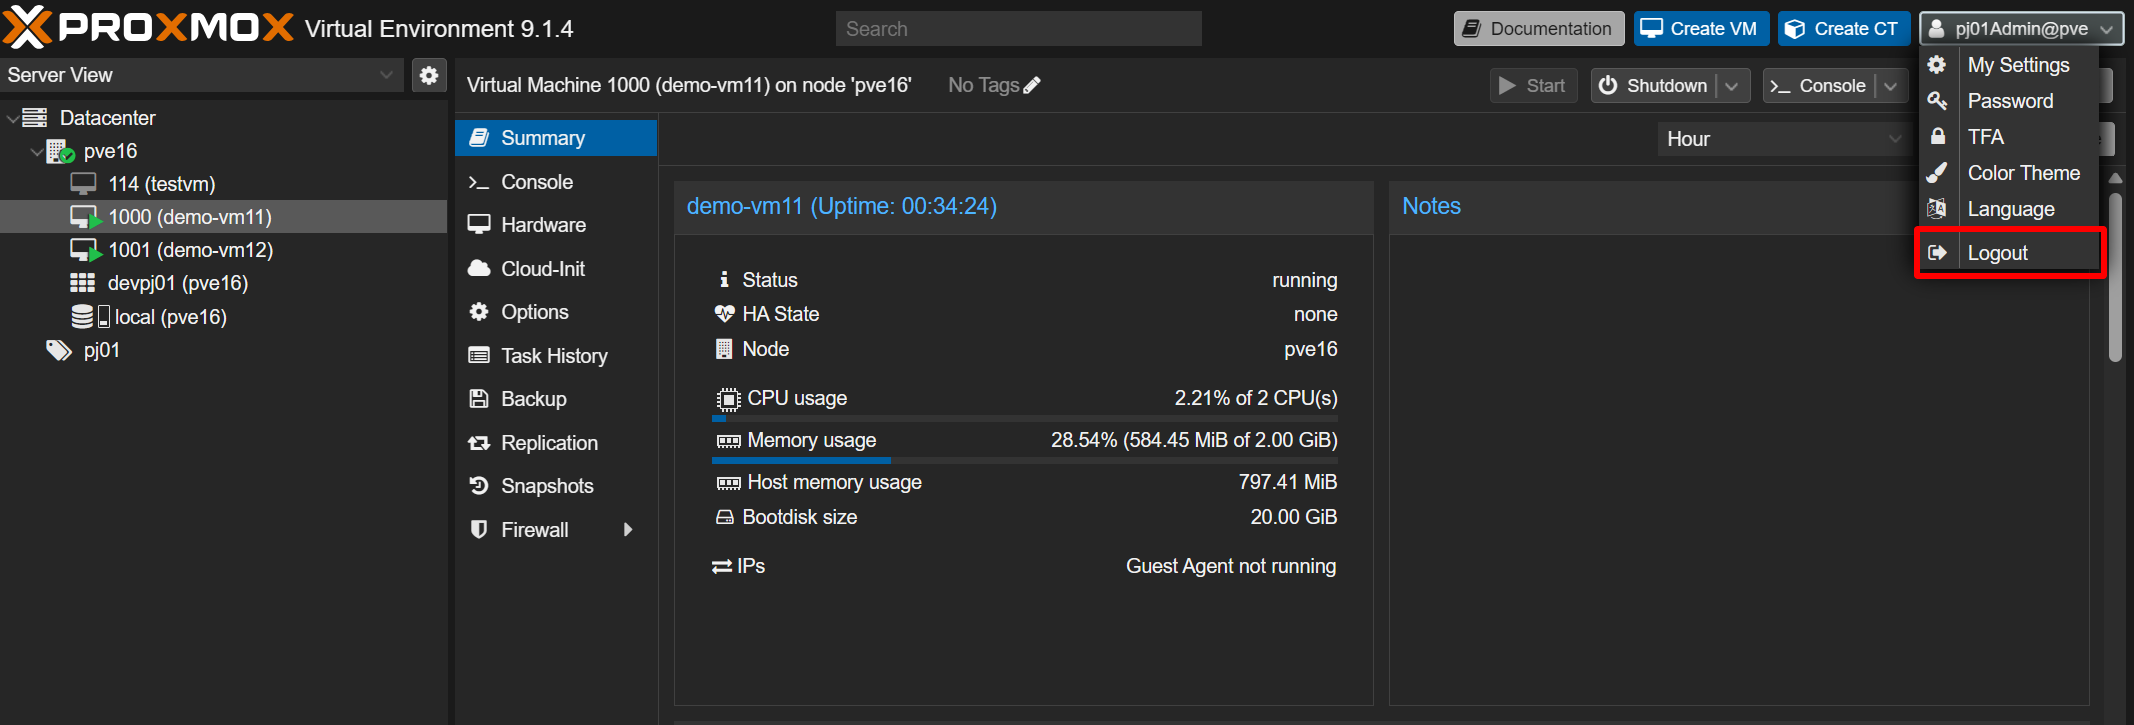
Log out to go to the next step.
Log in to pj02 similarly and confirm you see only its VMs (for example, 2000 demo-vm2).

Right-click a VM to perform shutdown/start, create snapshots, or start backups. You can also create or delete VMs within the project.
M5 Wrap-up
What this mission demonstrated
- The Pritunl VM on vmbr0 is not part of any project and thus isolated from project networks
- Each isolated network has a Proxmox admin account
- Those admin accounts see only VMs belonging to their project, enabling self-service VM lifecycle operations for VPN users
Mission 6 - VM Organization Mission. Est. time: 30 minutes
In this demo, all VMs listed below are currently connected to vmbr0.
Assign these VMs to each tenant and organize the network layout.
No operating systems are installed on these VMs.
100 (pj1-haproxy-vm1)
101 (pj1-web-server)
102 (pj2-web-server)
103 (pj1-db-server1)
104 (pj2-db-server)
105 (pj3-ollama)
106 (pj1-bi-server1)
107 (pj2-staging-web-server)
108 (pj2-staging-db-server)
109 (pj3-alpaca)
110 (pj3-langchain)
111 (squid-proxy-common)
112 (bind-dns-common)
To assign existing VMs to tenants, perform the steps below.
- Assign a VM to a tenant
Datacenter -> pjXX (target tenant) -> Members -> Add -> Virtual Machine- Select the VM you want to assign to the target tenant, then click Add
- Change the VM network bridge
Datacenter -> pve16 -> <VMID> -> Hardware -> Network Device- Change Bridge from vmbr0 to the corresponding tenant bridge (vnetpjXX)
In this demo, the VMs do not have operating systems installed, so you cannot change IP addresses. In real VMs, you also need to update IP address, subnet, gateway, and related network settings.
This allows you to place only the VMs you want to expose into the target tenant, while keeping unrelated VMs hidden. As a result, the environment can be safely exposed to external companies or other teams.
Mission accomplished!
You have learned:
- How VPN users connect to the VPN servers.
- How to perform an MSL Setup installation.
- How to perform initial Pritunl configuration.
- How easy it is to manage VPN users and profiles.
- How to download VPN profiles for end users.
- How to build VMs in isolated environments.
- How to manage project VMs using the self-care portal.
Thank you for completing the demo. You may disconnect the VPN now. VPN profiles are automatically removed from the server after the demo slot ends, so you can remove them from your client. If you have feedback, please email [email protected].